Minecraft is more than just a game for many Mac users—it’s a personal project, a creative world, and sometimes, a technical puzzle. If you play Minecraft on your Mac, you’ve probably heard about the Minecraft folder. But what is it, where is it, and why does it matter? This guide takes you deep inside the Minecraft folder on Mac. You’ll learn not only how to find it, but also what’s inside, how to use it for mods, backups, and troubleshooting, and how to avoid common mistakes. Let’s unlock the secrets of Minecraft’s home on your Mac.
What Is The Minecraft Folder On Mac?
Every time you launch Minecraft on your Mac, the game needs a place to store your worlds, settings, screenshots, and downloaded content. This place is called the Minecraft folder. Technically, it’s often referred to as the .minecraft folder. It holds everything that makes your game personal—your saved games, resource packs, mods, logs, and much more.
Unlike Windows, which stores Minecraft data in a visible folder, the Mac version hides it by default. This is both for safety and to prevent accidental changes. But if you want to customize your experience, knowing how to access and manage the Minecraft folder is essential.
Why You Need To Access The Minecraft Folder
Some players never need to open the Minecraft folder. But if you want to install mods, apply resource packs, back up your worlds, or fix errors, you will need to find it.
Here are the main reasons to access the Minecraft folder on Mac:
- Installing mods and resource packs for new features and graphics.
- Backing up worlds to avoid losing your creations.
- Restoring or transferring saved games between computers.
- Troubleshooting crashes and errors by checking logs or removing problem files.
- Customizing game settings beyond what’s possible in the regular menu.
Many beginners do not realize that the Minecraft folder is separate from the application itself. Deleting Minecraft from Applications does not remove your worlds—those are in the Minecraft folder.
Credit: www.minecraftforum.net
Where Is The Minecraft Folder Located On Mac?
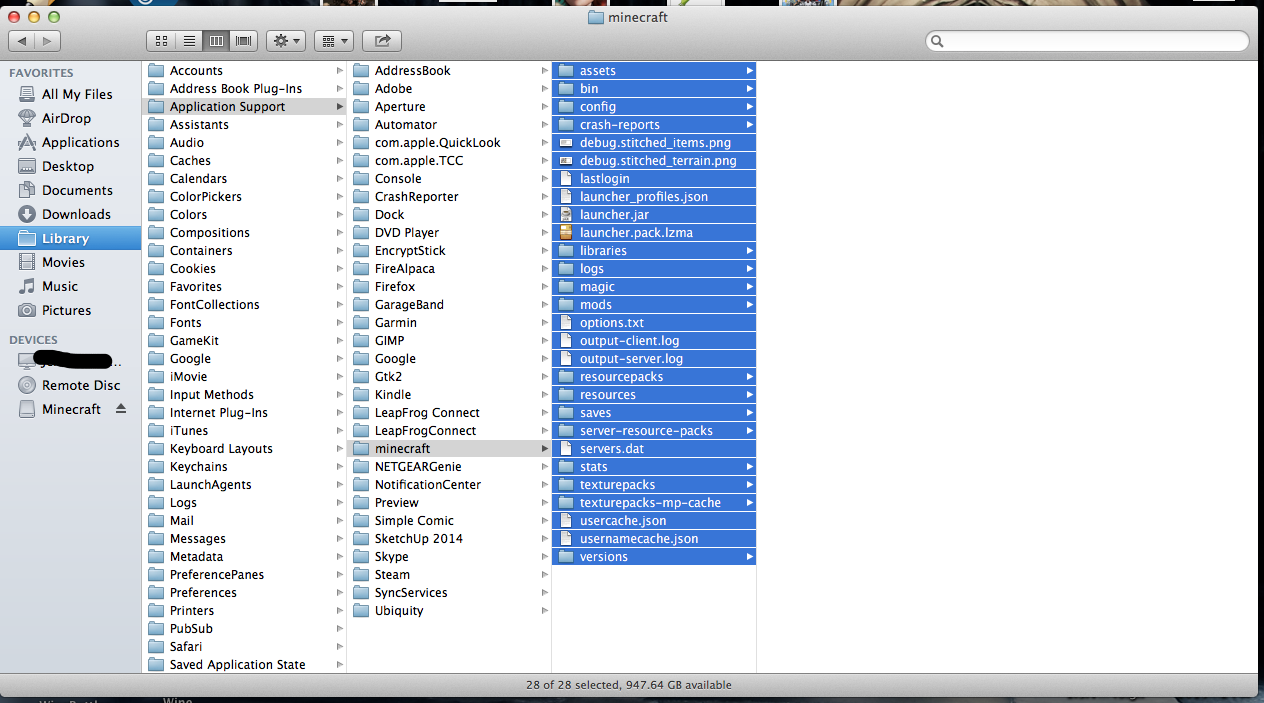
The Minecraft folder is hidden inside your user’s Library folder. By default, it’s at:
`/users/[yourusername]/library/application Support/minecraft`
But the Library folder is hidden in Finder. Here’s how to access it:
- Open Finder.
- Click Go in the menu bar.
- Hold the Option key. The Library option will appear.
- Click Library.
- Open Application Support.
- Find and open the minecraft folder.
It’s important to note: The folder is called minecraft (not .minecraft) on Mac, but on Windows, it’s .minecraft.
Quick Access Using Finder
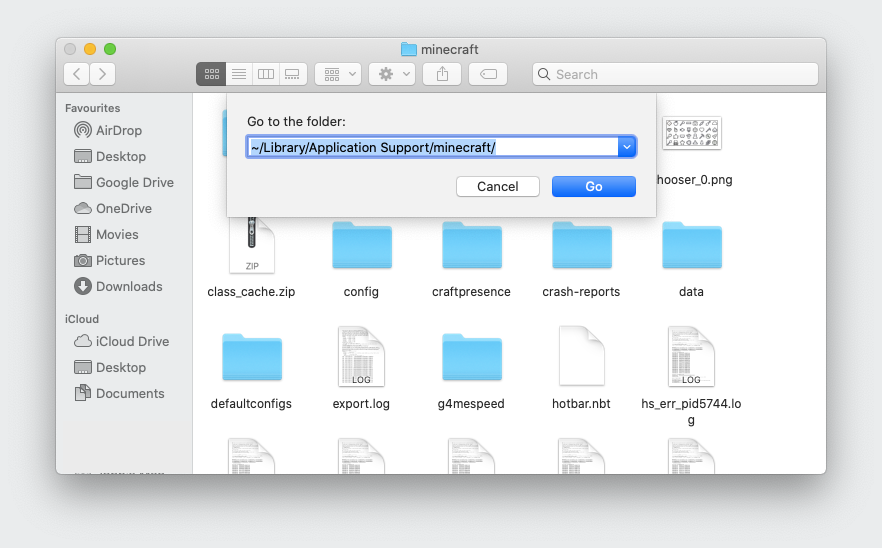
You can also use the Go to Folder command in Finder:
- In Finder, press Command + Shift + G.
- Enter `~/Library/Application Support/minecraft`
- Press Return.
This opens the Minecraft folder directly.
Table: Minecraft Folder Locations On Different Systems
Here’s a quick comparison of where Minecraft stores its data on different operating systems:
| System | Default Minecraft Folder Location |
|---|---|
| Mac | /Users/[YourUsername]/Library/Application Support/minecraft |
| Windows | C:\Users\[YourUsername]\AppData\Roaming\.minecraft |
| Linux | /home/[YourUsername]/.minecraft |
Many beginners overlook the need to hold the Option key to reveal the Library in Finder. Missing this step is a common frustration!
What’s Inside The Minecraft Folder?
Once you open the Minecraft folder, you’ll see many subfolders and files. Each serves a different purpose. Understanding what’s inside helps you manage, back up, and customize your game safely.
Some of the key items include:
- Saves: Contains your worlds and all their data.
- Resourcepacks: Stores resource packs for changing graphics and sounds.
- Mods: Holds mods (if you use a mod loader like Forge or Fabric).
- Screenshots: Minecraft saves your F2 screenshots here.
- Logs: Game logs for troubleshooting.
- Options.txt: Stores your game settings.
- Launcher_profiles.json: Keeps track of your game profiles and accounts.
Let’s break down the most important ones for Mac users:
Saves
This is the most critical folder. Each world you create is a subfolder here. Copying or backing up this folder protects your builds and progress.
Resourcepacks
If you download resource packs (sometimes called texture packs), put them here. You can then enable them in Minecraft’s settings.
Mods
For modded Minecraft, you’ll need a mod loader like Forge. Once installed, mods go in this folder. No mods folder? Just create one.
Logs
When Minecraft crashes or acts strangely, the logs folder contains text files showing what went wrong. These are often needed when asking for help online.
Options.txt
Advanced users sometimes edit this file to tweak settings not available in the game menus.
Table: Key Minecraft Folder Contents
Here’s a summary of what you’ll find and why it matters:
| Folder/File | Purpose |
|---|---|
| saves | All your Minecraft worlds and their data |
| resourcepacks | Graphic and sound packs |
| mods | Game mods (extra features, items, etc.) |
| screenshots | Images captured in-game |
| logs | Records of game activity and errors |
| options.txt | Custom game settings |
| launcher_profiles.json | Login data and profiles |
How To Install Mods Using The Minecraft Folder
Mods can transform Minecraft, adding new creatures, items, or even whole gameplay systems. On Mac, installing mods is simple, but you need to do it correctly for them to work.
Here’s a basic process for installing mods:
- Install a mod loader: Most mods need Forge or Fabric. Download the installer from the official website and run it.
- Open the Minecraft folder: Use the steps above.
- Find the mods folder: If it doesn’t exist, create a folder named mods.
- Download your mod: Make sure the mod version matches your Minecraft and mod loader.
- Drag the mod file (usually .jar) into the mods folder.
- Restart Minecraft using the Forge/Fabric profile.
Example: Adding Optifine
OptiFine is a popular Minecraft mod that improves graphics and performance. To install it:
- Download OptiFine for your version.
- Place the OptiFine .jar file in the mods folder (after installing Forge).
- Launch Minecraft with the Forge profile.
A common mistake is using the wrong mod version. Mods must match your Minecraft and Forge/Fabric version exactly.
How To Install Resource Packs
Resource packs change the look and sound of Minecraft. You can download packs from sites like Planet Minecraft or the official Minecraft marketplace.
To install:
- Download the resource pack (should be a .zip file).
- Open the Minecraft folder, then open resourcepacks.
- Drag the .zip file into the resourcepacks folder.
- Start Minecraft and go to Options > Resource Packs.
- Select and enable your new pack.
You don’t need to unzip the pack—just move the. zip file.
Credit: minecrafthopper.net
Backing Up Your Minecraft Worlds
Your Minecraft worlds are precious. A computer crash, update error, or accidental deletion can wipe out hours or years of work. Backing up is simple and can save you from disaster.
Step-by-step: Backing Up
- Open your Minecraft folder.
- Open the saves folder.
- Copy the world folder you want to back up.
- Paste it somewhere safe (external drive, cloud storage, etc. ).
Do this regularly, especially before updating Minecraft or installing mods.
Restoring A Backup
To restore a world, copy the backup folder back into the saves folder. Start Minecraft, and your world will appear on the play menu.
Advanced tip: You can transfer worlds between Macs by copying the saves folder.
Customizing Minecraft Settings
The Minecraft folder holds more than worlds and mods. You can customize advanced settings by editing files directly.
- Options.txt: Change game options not visible in the regular menus, like field of view (FOV) or render distance.
- Launcher_profiles.json: For advanced users who want to copy profiles between Macs.
Editing these files is optional. Always make a backup before changing them.
Managing Screenshots And Logs
Minecraft takes screenshots with F2. On Mac, these go into the screenshots folder. You can move, share, or edit them from here.
The logs folder can help you fix crashes. If your game won’t start, check the latest log file for error messages. Forums often ask for this file when helping with bugs.
Common Problems And Solutions
Some Mac users face issues with the Minecraft folder. Here’s how to fix the most frequent problems:
Problem: Can’t Find The Minecraft Folder
- Solution: Make sure you’re in the correct Library folder. Use Command + Shift + G and enter the full path.
- Insight: There are two Library folders on Mac—one at the system level, one for your user. You need the user Library.
Problem: Mods Don’t Work
- Solution: Double-check that your mod, Minecraft, and Forge/Fabric versions all match.
- Some mods require extra steps, like installing a core library.
Problem: Worlds Don’t Appear
- Solution: Make sure you copied the world folder into saves.
- World folders must contain files like level.dat—if you only copy the contents, Minecraft won’t see the world.
Problem: Resource Packs Not Showing Up
- Solution: Confirm the resource pack is still zipped and compatible with your Minecraft version.
Problem: “application Support” Folder Missing
- Solution: It’s never missing—just hidden. Use the Go menu and hold Option.
Advanced Tips For Power Users
If you want to get the most from Minecraft on your Mac, explore these advanced options:
Using Multiple Minecraft Installations
You can run different Minecraft versions by creating multiple folders:
- Copy the entire minecraft folder and rename it (for example, minecraft-1.18).
- Use a launcher like MultiMC to set a custom data folder for each version.
- This keeps mods, settings, and worlds separate.
Syncing Minecraft Between Macs
For players with more than one Mac, you can sync your Minecraft folder using cloud services like Dropbox or iCloud Drive:
- Move your minecraft folder into your cloud drive.
- Create a symbolic link (symlink) in your Application Support folder pointing to the new location.
This way, worlds and settings update automatically.
Table: Regular Vs. Advanced Minecraft Folder Uses
| Regular User | Advanced User |
|---|---|
| Installs resource packs | Creates symlinks for cloud sync |
| Backs up worlds | Runs multiple Minecraft instances |
| Installs basic mods | Edits configuration files for tweaks |
| Shares screenshots | Automates backups with scripts |
How To Reset Or Reinstall Minecraft Without Losing Worlds
Sometimes, Minecraft develops issues you can’t fix. Reinstalling the game often helps, but you don’t want to lose your worlds or mods.
Steps To Reinstall Safely
- Back up your entire Minecraft folder.
- Delete the minecraft folder from Application Support.
- Reinstall Minecraft from the official website.
- Copy your saves (and any other important folders) back into the new minecraft folder.
This process gives you a fresh start while keeping your worlds and customizations.
Credit: www.youtube.com
Important Security Tips
The Minecraft folder is powerful, but with power comes risk. Here’s how to stay safe:
- Never download mods or resource packs from untrusted sites. Malware can hide in these files.
- Back up regularly. Cloud backups are best for disaster recovery.
- Do not delete files you don’t recognize unless you know what they do.
- Keep your mod loader and mods updated to avoid bugs and security problems.
Common Mistakes When Managing The Minecraft Folder
Many beginners make simple errors when handling the Minecraft folder. Avoid these for a smooth experience:
- Deleting the wrong folder. Make sure you’re in Application Support, not the main Library or System folders.
- Forgetting backups before making changes.
- Mixing up versions of mods, packs, or the game itself.
- Not showing hidden folders in Finder, leading to confusion.
- Copying only world contents, not the entire folder, causing worlds not to load.
Useful Shortcuts And Tricks
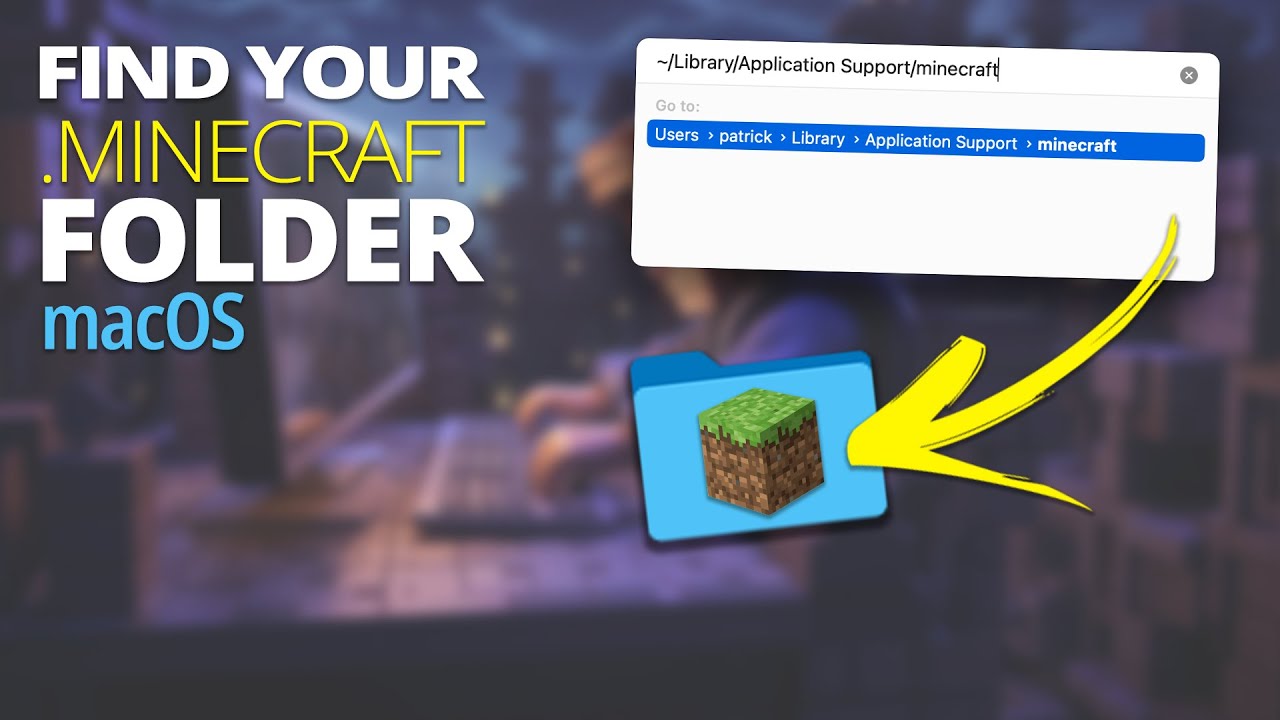
- Quickly open the Minecraft folder: In Finder, click Go > Go to Folder, then paste `~/Library/Application Support/minecraft`.
- Drag the Minecraft folder to your Finder sidebar for faster access in the future.
- Use Spotlight search for “minecraft” in Application Support if you can’t find the folder.
Keeping Your Minecraft Folder Organized
A tidy Minecraft folder saves you time and prevents errors. Tips for good organization:
- Label your world backups with dates.
- Keep only the mods you use. Remove old or broken ones.
- Archive old resource packs.
- Use folders for screenshots by project or date.
Frequently Asked Questions
How Do I Open The Minecraft Folder On Mac Quickly?
Press Command + Shift + G in Finder. Enter `~/Library/Application Support/minecraft` and hit Return. This jumps straight to the Minecraft folder, even if the Library is hidden.
What Should I Back Up To Save My Minecraft Worlds?
Back up the entire saves folder. Each world is a separate folder inside. Copy this to an external drive or cloud storage. To restore, just copy it back.
Can I share my Minecraft worlds with friends using the folder?
Yes. Find your world’s folder inside the saves directory. Compress it (right-click > Compress) and send the zip file. Your friend should place it in their own saves folder.
Why Can’t I See The Library Folder In Finder?
The Library folder is hidden by default. In Finder, click Go and hold Option—the Library will appear in the menu. You can also use Go to Folder.
Is it safe to delete the Minecraft folder if I want to start over?
Yes, but first back up your saves and anything you want to keep. Deleting the folder resets Minecraft to its original state, but all worlds, mods, and resource packs will be lost unless you copy them out first.
Managing the Minecraft folder on Mac opens a world of customization and control. Whether you’re installing mods, backing up your creations, or troubleshooting issues, understanding this folder gives you power over your game. Remember to back up, stay organized, and use only trusted sources for downloads. For more technical tips, the official Minecraft Help Center has in-depth guides for Mac users. With this knowledge, you’re ready to explore, build, and play Minecraft your way—confidently and safely.