Minecraft is a game that rewards creativity, but it also demands resourcefulness. When you finally get that rare enchanted sword or a powerful pickaxe, it’s a moment to celebrate. But what happens when your prized item starts to break? Many players panic or simply toss their tools away, not knowing that repairing enchanted items can save resources, preserve hard-earned enchantments, and keep you equipped for adventure. Learning how to repair these valuable tools is essential, especially as you explore deeper caves, battle hostile mobs, or build massive structures. This guide dives deep into every aspect of repairing enchanted items in Minecraft. Whether you’re a new player or a seasoned adventurer, you’ll discover practical strategies, hidden mechanics, and expert tips that most guides miss.
Why Repair Enchanted Items In Minecraft?
Repairing enchanted items is not just about saving resources—it’s about maximizing the value of your tools and weapons. Enchantments like Unbreaking, Mending, and Sharpness can take hours to obtain. Throwing away damaged enchanted gear wastes not only materials but also your time and experience.
Keeping enchanted gear in top shape offers several advantages:
- Preserves enchantments: You keep all enchantments instead of losing them.
- Cost-effective: Less resource waste compared to crafting new gear.
- Efficiency: High-level enchantments are hard to obtain repeatedly.
- Gameplay advantage: Repaired items can be even better if combined smartly.
Many new players don’t realize that the right repair method can actually improve their gear, making it last longer or combine enchantments for even more power.
Main Methods To Repair Enchanted Items
There are three main ways to repair enchanted items in Minecraft: using an Anvil, a Grindstone, or the crafting grid. Each method has unique features, costs, and outcomes. Choosing the best one depends on your needs and the enchantments you want to keep or improve.
Using An Anvil
The anvil is the most popular and powerful tool for repairing enchanted items. It allows you to combine enchantments, keep valuable upgrades, and even rename your gear.
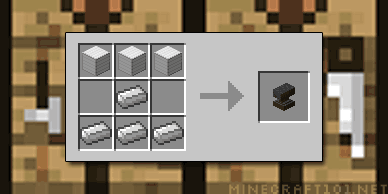
How To Craft An Anvil
To make an anvil, you need:
- 3 Blocks of Iron
- 4 Iron Ingots
Recipe layout:
- Place 3 iron blocks in the top row of the crafting table.
- Put 1 iron ingot in the center.
- Fill the bottom row with 3 iron ingots.
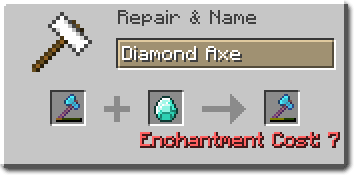
Repairing With An Anvil
To repair an enchanted item:
- Place the damaged enchanted item in the first slot.
- Add either the same item (even if unenchanted) or the material used to craft it (e.g., diamonds for a diamond sword) in the second slot.
- The anvil shows the repair cost in experience levels.
- If you accept, the item is repaired, and you keep all enchantments.
Combining Enchantments
One powerful feature of anvils is that you can:
- Combine two enchanted items to merge their enchantments.
- Repair items while stacking enchantments (as long as they’re compatible).
For example, combining a diamond sword with Sharpness III and one with Unbreaking II could give you a sword with both enchantments.
Anvil Repair Cost
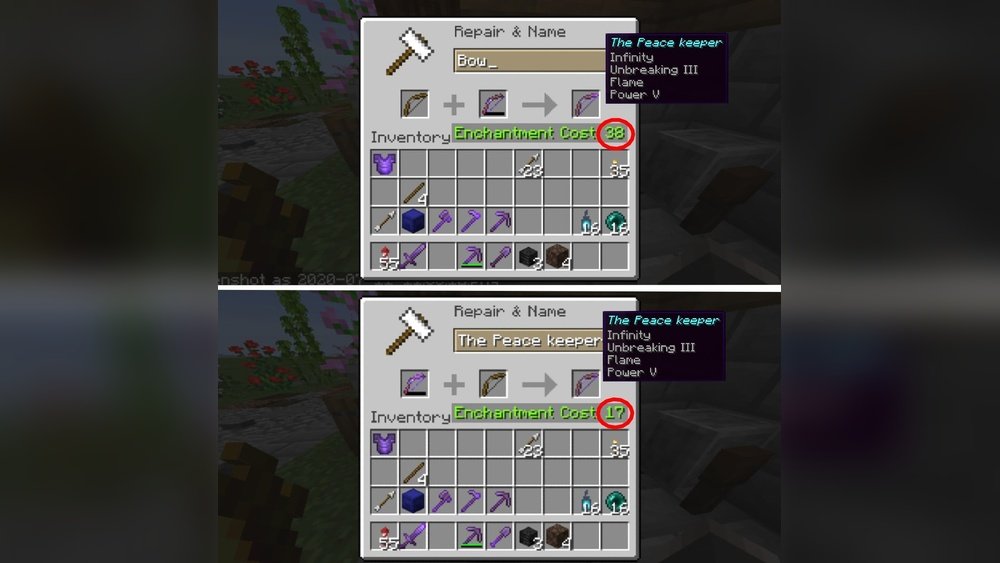
The anvil’s cost is measured in experience levels. Each repair or combination increases the item’s prior work penalty, making future repairs more expensive. Eventually, you may see “Too Expensive!” if the cost exceeds 39 levels.
Limits And Drawbacks
- Anvils have durability and can break after about 25 uses.
- Repairing the same item repeatedly gets more costly.
- Some enchantments cannot be combined (e.g., Sharpness and Smite).
Practical Example
Suppose you have a diamond pickaxe with Efficiency IV, Fortune II, and Unbreaking III. If it’s low on durability, repairing with diamonds on an anvil lets you keep all these enchantments. If you combine it with another pickaxe with Efficiency IV, you could even upgrade to Efficiency V.
Using A Grindstone
The grindstone is another tool for repairing items, with some important differences.
Crafting A Grindstone
You need:
- 2 Sticks
- 2 Wooden Planks
- 1 Stone Slab
Place the stone slab in the middle, sticks on either side, and wooden planks below the sticks.
How Grindstone Repairs Work
- Place two items of the same type in the grindstone.
- The resulting item is repaired, combining durability.
- All enchantments are removed (except curses).
- You gain a small amount of experience for the removed enchantments.
When To Use A Grindstone
- If you have two low-durability enchanted items you don’t want.
- To remove unwanted enchantments and start fresh.
- Never use for valuable enchanted gear you want to keep.
Hidden Insight
Many players forget that the grindstone provides a small XP refund when removing enchantments. If you farm enchanted books with useless enchantments from fishing or trading, you can grindstone them for extra XP.
Using The Crafting Table Or Crafting Grid
This is the simplest way, but also the most limited.
How Crafting Repairs Work
- Combine two of the same item in the crafting grid (2×2 or 3×3).
- You get one item with combined durability plus a small bonus.
- All enchantments are lost (except curses).
When To Use Crafting Repairs
- Only for unenchanted gear, or when you don’t care about enchantments.
- Sometimes used for quick repairs in the early game.
Important Tip
If you accidentally combine enchanted items in the crafting grid, you lose all enchantments. Always double-check before repairing.
Credit: www.minecraft101.net
When To Repair Versus When To Replace
Not all enchanted items are worth repairing. Sometimes, making a new item is better. Here’s how to decide:
Factors To Consider
- Enchantment Value: If your tool has rare or high-level enchantments, repair it.
- Repair Cost: If the anvil says “Too Expensive!”, consider making a new item.
- Material Rarity: Diamond and netherite are harder to replace than iron or stone.
- Mending Enchantment: If your item has Mending, prioritize repairing it.
Example Scenarios
- A wooden sword with Sharpness I isn’t worth repairing.
- A diamond pickaxe with Fortune III and Unbreaking III is almost always worth repairing.
How The Mending Enchantment Changes Repairs
The Mending enchantment is a game-changer. It allows your item to repair itself using experience orbs.
How Mending Works
- When holding or wearing an item with Mending, collected XP repairs the item instead of going to your XP bar.
- Each XP point restores 2 durability points.
Tips For Using Mending
- Combine Mending with Unbreaking for maximum durability.
- Use Mending on your best tools, armor, and weapons.
- Farm XP efficiently (mining, mob farms, fishing, etc.) To keep items repaired.
Mending Vs. Anvil Repairs
With Mending, you rarely need to use an anvil. But you might still use an anvil to add new enchantments or combine items.
Overlooked Detail
Many players don’t realize that offhand items (like a shield) with Mending also repair if you gain XP while holding them. You can even swap tools while collecting XP to control which one gets repaired.
How Anvil Repair Costs Are Calculated
Understanding anvil repair costs helps you plan repairs and avoid the “Too Expensive!” message.
What Determines Repair Cost?
- Prior Work Penalty: Each time you repair or combine an item, the cost goes up (1, 2, 4, 8, etc. ).
- Enchantment Levels: Higher-level enchantments cost more to repair.
- Material Used: Using the base material (e.g., a diamond) is cheaper than combining two enchanted items.
- Renaming: Renaming an item costs a bit extra, but can reset the cost penalty in some Minecraft versions.
Managing Repair Costs
- Repair items early, before the penalty gets too high.
- Combine enchantments efficiently—try to get all you want in one or two steps.
- Use Mending to avoid constant anvil repairs.
Example Of Increasing Cost
If you repair a sword three times, the next repair might cost 16 levels. After a few more repairs, the anvil will say “Too Expensive!” and you must make a new item.
Combining And Upgrading Enchantments
Repairing is also your chance to upgrade enchantments. With careful planning, you can combine two enchanted items to create a much stronger tool.
How To Combine Enchantments
- Place two similar items in the anvil (e.g., two pickaxes).
- The result will have the highest level of each enchantment (if compatible).
- If both items have the same enchantment, the levels combine (e.g., two Efficiency III gives Efficiency IV).
Smart Combination Tips
- Always combine items with the most shared enchantments first to save XP.
- Some enchantments are mutually exclusive (e.g., Silk Touch and Fortune).
- Books can be used to add or upgrade single enchantments on an item.
Example
Combining a sword with Sharpness III and one with Sharpness III gives Sharpness IV. If one also has Unbreaking II, you get a sword with both Sharpness IV and Unbreaking II.
Repairing Each Gear Type: Best Practices
Each type of item—weapons, tools, and armor—has its own repair strategies. Here’s how to get the most from your repairs.
Tools (pickaxes, Axes, Shovels, Hoes)
- Always use an anvil for enchanted tools.
- Add Mending and Unbreaking for long-term use.
- For high-value tools (diamond/netherite), combine enchantments to maximize efficiency.
Weapons (swords, Bows, Crossbows, Tridents)
- Swords: Repair with anvil and combine enchantments for maximum power.
- Bows/Crossbows: Use books to add Power, Infinity, or Quick Charge.
- Tridents: Rare and expensive—always repair on an anvil and use Mending.
Armor (helmets, Chestplates, Leggings, Boots)
- Combine Protection, Unbreaking, and Mending for the best sets.
- Boots: Look for Feather Falling and Depth Strider.
- Shields: Repair on an anvil, especially if enchanted.
Elytra
- Elytra (wings) can be repaired with phantom membranes on an anvil.
- Add Unbreaking and Mending for maximum flight time.
- Never use the crafting grid or grindstone, or you’ll lose enchantments.
Repairing Items With Curses
Some items have Cursed Enchantments (Curse of Binding, Curse of Vanishing). Here’s what you need to know:
- Curses cannot be removed through repair or grindstone.
- If you combine a cursed item with a normal item, the curse stays.
- Only use cursed items if you’re sure you want to keep them.
Common Mistakes In Repairing Enchanted Items
Many players lose valuable gear due to simple mistakes. Avoid these errors:
- Using the crafting grid: All enchantments are lost if you repair enchanted items this way.
- Not checking the anvil cost: “Too Expensive!” means you can’t repair it anymore.
- Combining incompatible enchantments: Some enchantments cancel each other out.
- Repairing cheap items: Don’t waste resources repairing low-level gear.
- Ignoring Mending: Many players forget to add Mending, missing out on “infinite” repairs.
Key Differences: Anvil Vs. Grindstone Vs. Crafting Table
Here’s a quick comparison of the three repair methods:
| Method | Keeps Enchantments? | XP Cost | Combines Enchantments? | Removes Curses? |
|---|---|---|---|---|
| Anvil | Yes | Yes | Yes | No |
| Grindstone | No | No (gains XP) | No | No |
| Crafting Table/Grid | No | No | No | No |
How To Get Mending And Other Rare Enchantments
Getting Mending is often the hardest part of repairing top-tier gear. Here’s how to find it:
- Villager Trading: Librarian villagers can offer Mending books.
- Fishing: Rarely, you can fish up enchanted books with Mending.
- Loot Chests: Occasionally found in end cities or dungeon chests.
Other rare enchantments like Infinity (for bows) or Soul Speed (for boots) are also best obtained via trading or loot.
Example Trading Strategy
Set up a villager trading hall near your base. Cure zombie villagers for better deals. Reset librarian trades by breaking and replacing their lectern until you see Mending as an option.
Advanced Repairing: Maximizing Durability And Value
To get the most from your enchanted items, use these advanced strategies:
Combining Books First
Combine enchanted books on an anvil before applying them to your tool. This reduces the prior work penalty and saves XP.
Repairing With Materials Vs. Items
- Using the base material (e.g., a diamond) is usually cheaper than combining two enchanted items.
- Only combine two enchanted items if you want to merge enchantments.
Renaming Items
Renaming an item on the anvil can help you keep track of your best gear. In some versions, it may also slow the increase of prior work penalty, but this mechanic has changed over time.
Using Xp Farms
Create a mob farm, furnace XP farm, or fishing farm to generate XP quickly. This lets you repair your Mending gear without grinding for levels manually.
Example: The Ultimate Pickaxe
- Start with a diamond pickaxe.
- Add Efficiency IV, Unbreaking III, Fortune III, and Mending.
- Repair only with Mending and XP from a mob farm.
- Result: A tool that lasts nearly forever.
Repairing Enchanted Items In Multiplayer And Hardcore
Multiplayer and hardcore modes add extra pressure to keep your gear in top shape.
Multiplayer
- Resources are often limited—repairing is more efficient than crafting new gear.
- PvP: Keeping armor and weapons repaired gives a big advantage.
- Share XP farms with teammates to repair everyone’s gear.
Hardcore Mode
- One life means losing enchanted gear can end your run.
- Always repair high-value items before they break.
- Use Mending and Unbreaking together for max durability.
Minecraft Repair Enchanted Items: Real Game Examples
To make these tips practical, here are real scenarios from experienced players:
- End City Elytra: You find an elytra in the End, but it’s damaged. Repair with phantom membranes on an anvil, then add Unbreaking and Mending.
- PvP Sword: Your best sword is nearly broken after a battle. Repair on an anvil using a diamond, keeping Sharpness V and Looting III.
- XP Farm Repairs: After mining or fighting mobs, use the XP to auto-repair all your Mending gear.
- Villager Trading: Trade with librarians for Mending books, then upgrade all your tools instead of crafting new ones.

Credit: www.reddit.com
Data: Durability And Repair Values
Understanding durability and how much each repair restores helps you plan better.
| Item | Material | Max Durability | Durability per Repair Material |
|---|---|---|---|
| Sword | Diamond | 1561 | ~25% per diamond |
| Pickaxe | Netherite | 2031 | ~25% per netherite ingot |
| Elytra | Phantom Membrane | 432 | ~25% per membrane |
Repairing Enchanted Items In Different Minecraft Versions
Different versions of Minecraft (Java, Bedrock, console) have slight differences in how repairs work.
- Java Edition: Prior work penalty applies; “Too Expensive!” cap at 39 levels.
- Bedrock Edition: No “Too Expensive!” cap, but repair costs can become very high.
- Older Versions: Crafting grid repairs used to keep enchantments, but not anymore.
Always check the mechanics for your current version. For official details, see the Minecraft Wiki.
Hidden Insights And Pro Tips
- Don’t repair cursed items unless necessary. They can ruin your inventory if you’re not careful.
- Keep backup gear. If repair costs get too high, have a replacement ready.
- Use bundles or shulker boxes to keep spare materials and books for field repairs.
- Plan enchantment combinations. Use online anvil calculators to minimize XP cost.
Frequently Asked Questions
What’s The Best Way To Repair Enchanted Items In Minecraft?
The anvil is usually the best way, as it keeps all enchantments and allows you to combine or upgrade them. Use repair materials for cheaper costs or combine with other enchanted items to stack enchantments.
Can You Repair Enchanted Items Without Losing Enchantments?
Yes, but only with an anvil. Both the grindstone and crafting table will remove all enchantments except curses. Always double-check before repairing.
Why Does The Anvil Say “too Expensive!” When Repairing?
This happens when the prior work penalty and enchantment costs together exceed 39 experience levels (in Java Edition). At this point, you can’t repair the item anymore and should consider making a new one.
How Does Mending Work With Repairing Enchanted Items?
The Mending enchantment uses XP orbs to automatically repair your gear, as long as you’re holding or wearing the item. This often means you never need to use an anvil, except to add new enchantments.
What’s The Difference Between Repairing With Materials And With Items?
Repairing with the base material (like diamonds) is cheaper and keeps enchantments. Combining two enchanted items can merge enchantments but costs more XP and increases the prior work penalty faster.
Minecraft’s repair system can seem complex at first, but mastering it will save you time, resources, and frustration. By using the right method for the right gear, combining enchantments wisely, and leveraging tools like Mending, you’ll keep your enchanted items at peak performance—ready for any challenge the world throws at you.
Credit: www.minecraft101.net