Are you ready to unlock a whole new level of creativity with your Photoshop projects? Using AI in Photoshop isn’t just a trend—it’s a game changer that can save you time and help you create stunning, lifelike images with ease.
Whether you want to remove unwanted objects, expand your canvas, or generate entirely new backgrounds, AI tools in Photoshop make these tasks simple and fun. You’ll discover step-by-step how to use these powerful AI features to transform your images effortlessly.
Keep reading to learn how to work smarter, not harder, and take your Photoshop skills to the next level.
Getting Started With Photoshop Ai
Getting started with Photoshop AI is simple and opens new creative paths. Adobe has added smart AI tools that help enhance photos quickly. These tools work inside Photoshop, making editing easier and more fun.
Start by updating Photoshop to the latest version. New AI features often come with updates. After updating, open Photoshop and import your image. Then you can explore AI tools like Generative Fill and Generative Expand.
How To Access Ai Features In Photoshop
Open Photoshop and load your image. Go to the Edit menu and look for AI options. For example, select “Generative Fill” to add or remove parts of your photo.
If you don’t see these options, check that your Photoshop is updated. Some AI features need a newer version to work properly.
Using Generative Fill To Edit Images
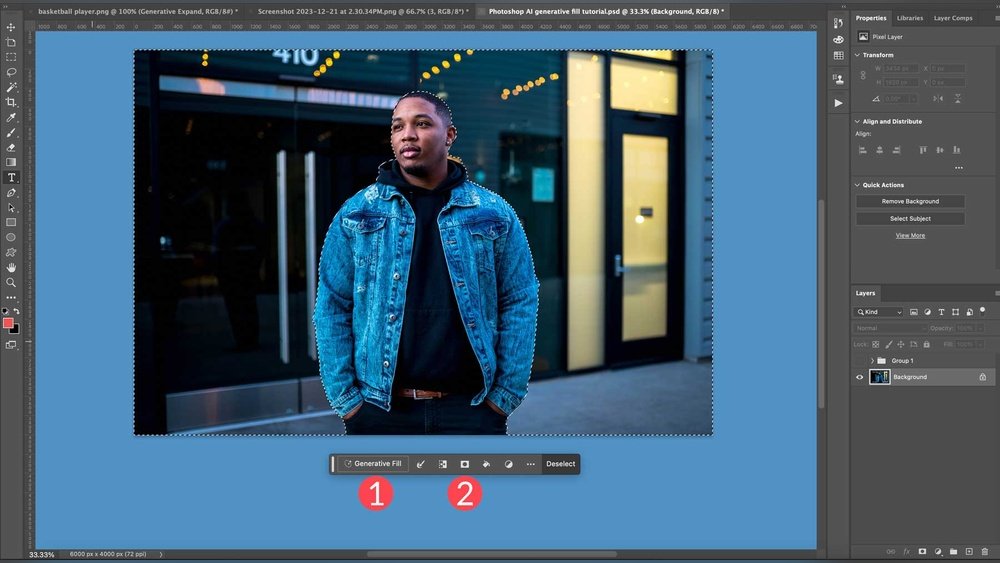
Generative Fill lets you change parts of your image by typing simple instructions. Select the area you want to edit. Type what you want to add or remove, then click Generate. Photoshop creates the changes automatically.
This tool helps fix backgrounds, add objects, or remove unwanted parts quickly. It saves time and reduces complex editing steps.
Tips For Best Results With Photoshop Ai
Use clear and simple instructions for AI tools. Short phrases work better than long sentences. Select the right area carefully to guide the AI.
Try different prompts to see what looks best. Practice helps you understand how AI interprets your commands.
Activating Generative Fill
Activating Generative Fill in Photoshop brings new creative power to your projects. This AI-driven feature lets you add, remove, or extend parts of an image easily. It works by understanding the context of the image and filling spaces with realistic content. Getting started is simple and helps you save time on complex edits.
Enable Generative Fill In Photoshop
First, open Photoshop and update it to the latest version. This ensures all AI tools are available. Go to the Edit menu. Find and click on Generative Fill to activate the feature. If you do not see this option, check your software version or preferences.
Select The Area For Generative Fill
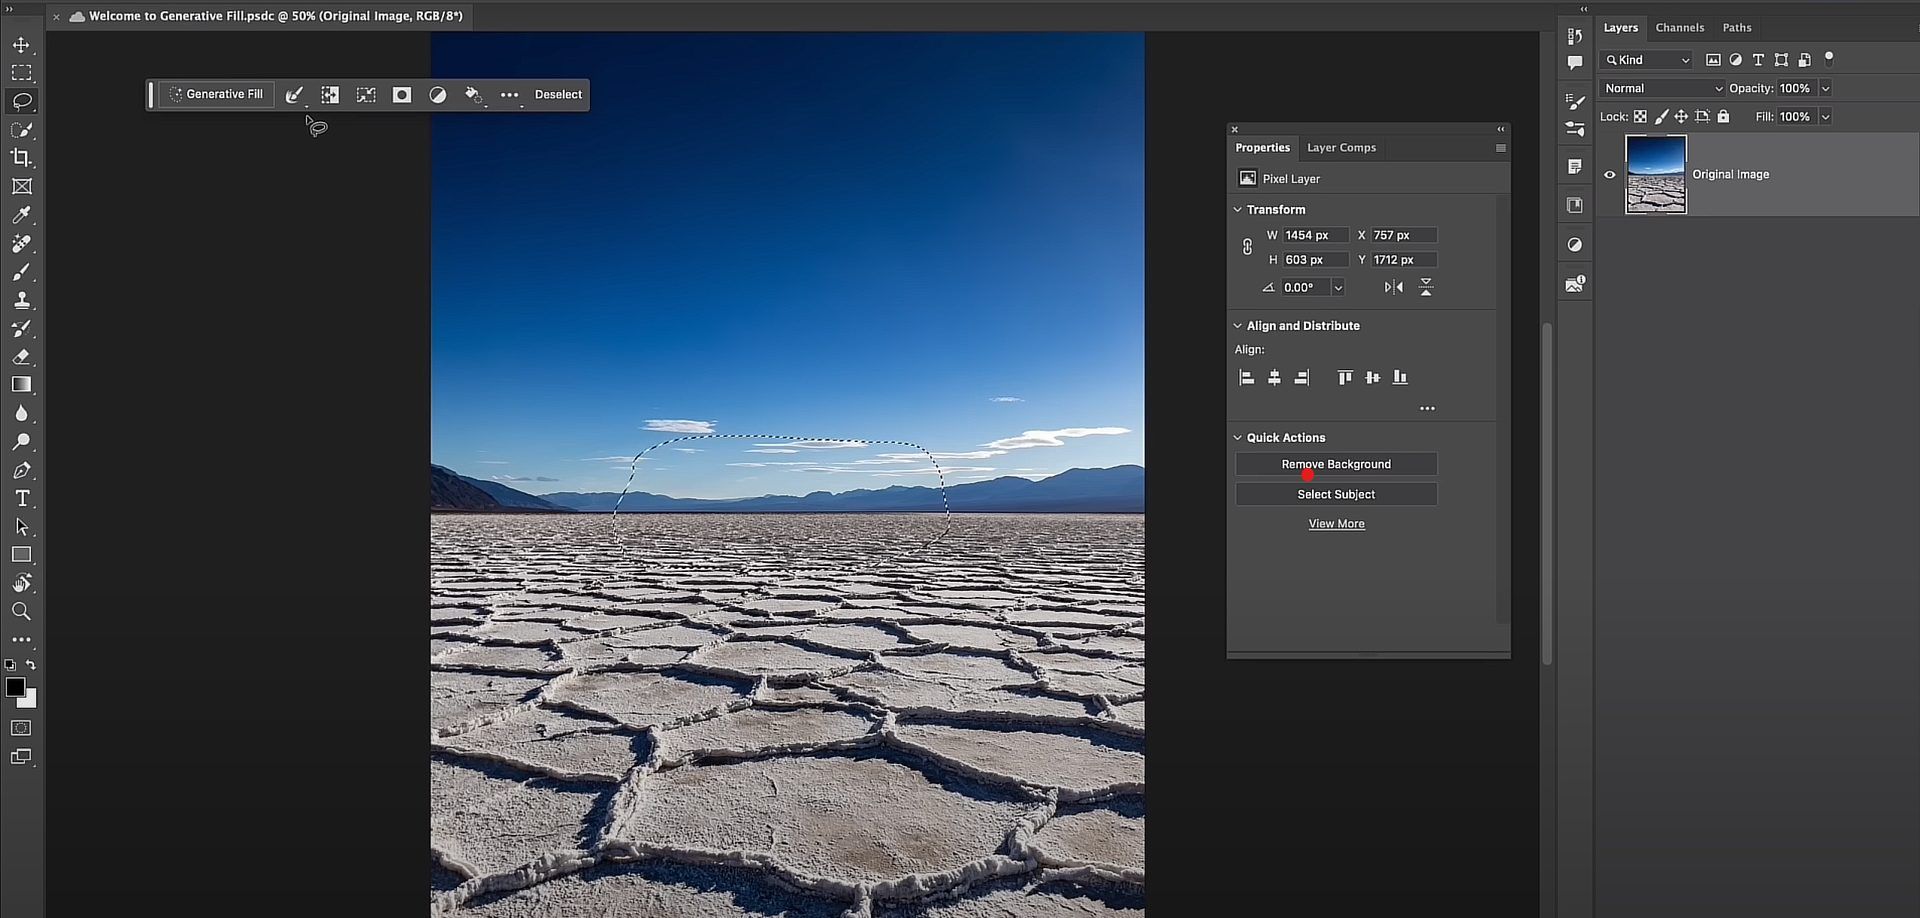
Use the selection tool to highlight the part of the image you want to change. You can choose any shape or object. The AI will focus only on this selected area. Make sure your selection is clear and precise for best results.
Enter Your Text Prompt
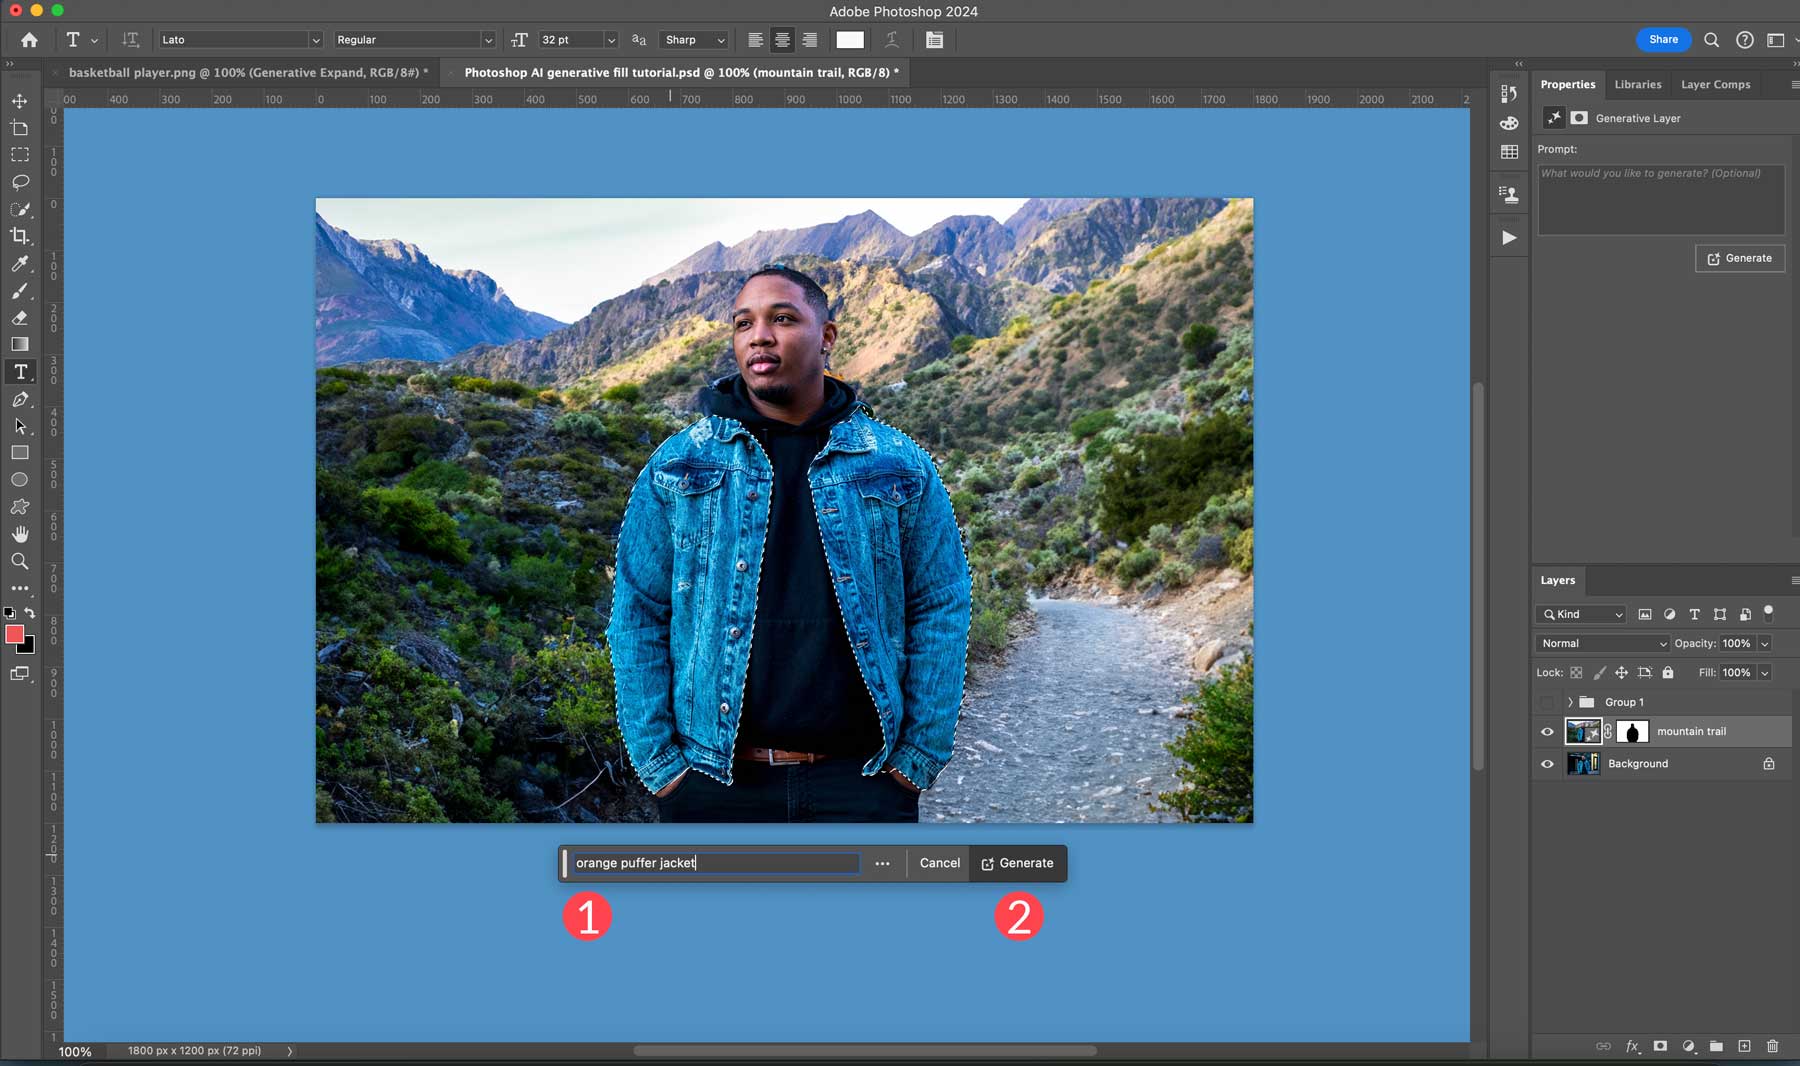
After selecting the area, a text box will appear. Type what you want to add or change in the image. For example, write “blue sky” or “add a tree.” Photoshop’s AI reads your prompt and generates matching content in the selected space.
Generate And Adjust The Fill
Click the Generate button to start the AI process. Wait a few seconds while Photoshop creates new image content. Review the results and use the undo or redo buttons if needed. You can refine your prompt or selection to get the perfect fill.
Using Text Prompts To Edit Images
Using text prompts to edit images in Photoshop offers a fresh way to work. This feature lets you type simple commands to change pictures fast. It makes editing easier and saves time. No need for complex tools or detailed menus.
With text prompts, you describe what you want. Photoshop’s AI reads your words and changes the image. You can add objects, remove parts, or change backgrounds just by typing.
How To Write Effective Text Prompts
Keep prompts clear and short. Use simple words to describe changes. For example, “add blue sky” or “remove person.” Avoid long sentences or unclear ideas. The AI works best with direct instructions.
Steps To Use Text Prompts In Photoshop
First, open your image in Photoshop. Select the area you want to edit. Click on the Generative Fill option. Type your text prompt in the box. Press generate and wait for the AI to work. Review the result and make changes if needed.
Tips For Better Image Results
Be specific about colors, shapes, and objects. Use adjectives like “bright,” “small,” or “old.” This helps the AI match your vision. Try different prompts to see various results. Experiment with small edits first.
Common Uses Of Text Prompts
Add missing objects or remove unwanted parts. Change backgrounds or create new scenes. Adjust lighting or add special effects. Text prompts help with creative ideas and quick fixes. They open new ways to improve photos.
Credit: www.elegantthemes.com
Expanding Canvas With Generative Expand
Expanding your canvas in Photoshop just got easier with the Generative Expand feature. This AI-powered tool lets you increase your image size while filling in new areas naturally. It helps create seamless extensions without manual cloning or complex edits.
Generative Expand uses artificial intelligence to analyze your image content. Then it generates matching pixels to blend with the original photo. This tool is perfect for adding background space or changing image dimensions creatively.
How To Activate Generative Expand In Photoshop
Open your image in Photoshop and select the crop tool. Drag the crop handles beyond the current canvas size to add extra space. After adjusting, look for the Generative Expand option in the toolbar or right-click menu. Click it to let AI fill the new canvas area automatically.
Tips For Best Results With Generative Expand
Choose images with clear subjects and simple backgrounds for smoother expansion. Avoid very busy or detailed photos as AI may struggle to match textures. Use small expansions first, then increase size gradually to keep the fill natural.
Common Uses For Expanding Canvas With Ai
Extend landscapes to add sky or ground space. Create room for text or graphics around your subject. Adjust composition by changing the image’s aspect ratio without cropping important parts. Generate creative effects by adding new elements that blend perfectly.
Creating New Assets From Text
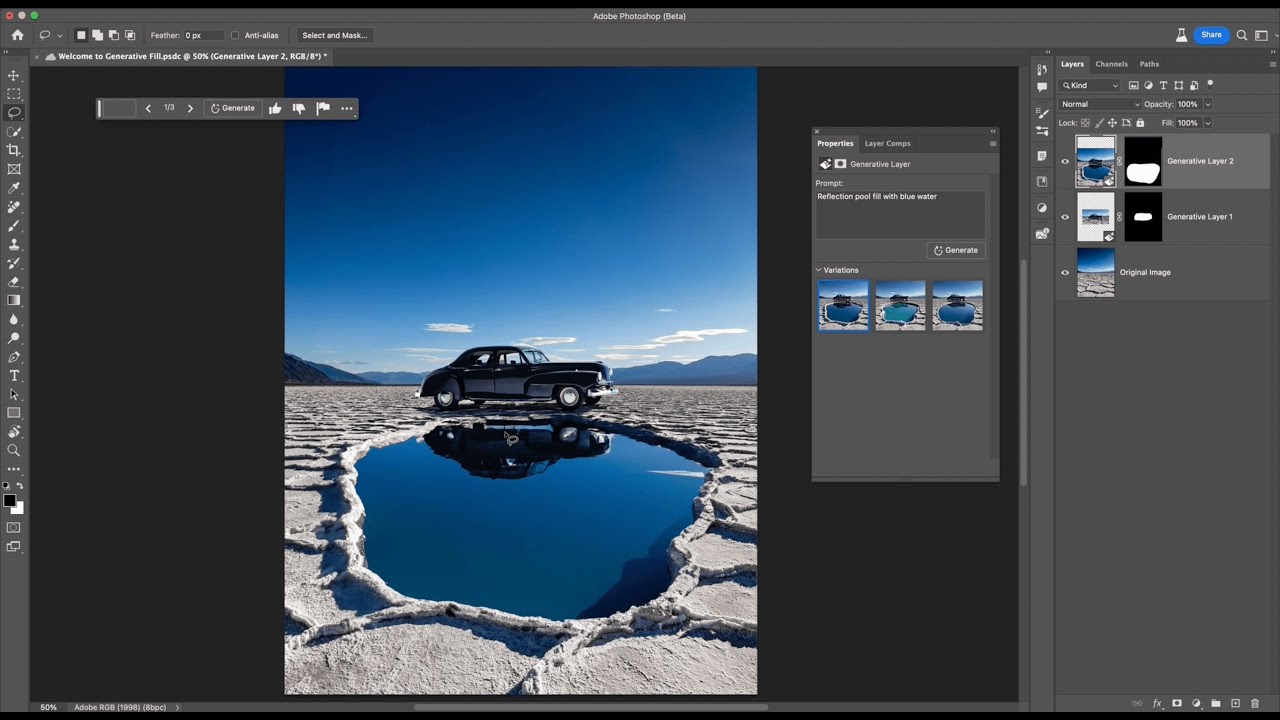
Creating new assets from text in Photoshop has become easier with AI tools. These tools transform simple text prompts into detailed images or design elements. This feature helps designers save time and explore creative ideas quickly. You can generate backgrounds, objects, or even textures by typing descriptions. The AI understands your text and creates visuals that fit your project needs.
This method opens many possibilities for beginners and professionals alike. It eliminates the need to draw or search for images manually. Just enter your idea in words, and Photoshop’s AI brings it to life.
How To Start Creating Assets From Text
Open Photoshop and load your base image or a blank canvas. Select the area where you want the new asset. Use the “Generative Fill” tool from the toolbar. Type a clear description of the asset you want. For example, “a red apple with a leaf.” Click generate and wait for the AI to create options.
Tips For Writing Effective Text Prompts
Keep your text simple and specific. Use clear nouns and adjectives. Avoid long sentences or vague words. For example, say “blue mountain with snow” instead of “nice nature scene.” The AI works better with direct and descriptive words. Experiment with different phrases to get varied results.
Editing And Refining Ai-generated Assets
After the AI creates the asset, you can move or resize it. Use Photoshop’s standard tools to adjust colors or shapes. Add filters or effects to match your style. If the asset needs changes, try rewriting the prompt and generating again. This process helps you find the best fit for your design.
Saving And Using Your New Assets
Once happy with the AI asset, save it as a separate layer or file. Use it in your project or export it for other uses. Organize your assets in folders for easy access later. This keeps your workflow clean and efficient.
Credit: www.youtube.com
Enhancing Images With Neural Filters
Neural Filters in Photoshop use artificial intelligence to enhance photos quickly and easily. These filters apply complex changes with just a few clicks. You can smooth skin, adjust facial features, or even change lighting. The AI works behind the scenes to keep images looking natural and clear. This tool saves time and improves photo quality for beginners and pros alike.
Accessing Neural Filters In Photoshop
Open your image in Photoshop. Go to the top menu and select Filter. Then click on Neural Filters. A new panel will open with many filter options. You can choose which effect to apply by clicking on the toggle switch next to each filter name. Photoshop will show a live preview on your image.
Using Skin Smoothing And Portrait Enhancements
Skin Smoothing helps reduce blemishes and wrinkles. It makes skin look soft and natural. Portrait Enhancements let you adjust eyes, smile, or face shape. Move sliders to increase or decrease effects. These adjustments improve portraits without heavy editing work.
Applying Color And Style Adjustments
Neural Filters also offer color changes and style transfers. You can change the lighting or add artistic styles to your photo. Select a filter like Colorize to add color to black and white images. Style Transfer can make your photo look like a painting. These effects add creativity and mood to your pictures.
Fine-tuning And Saving Your Image
After applying filters, use the slider controls to adjust intensity. You can combine multiple filters for unique results. When satisfied, click OK to apply changes. Save your image in the format you need. Neural Filters keep your edits non-destructive, so you can adjust later if needed.
Upscaling Images Using Ai Tools
Upscaling images using AI tools in Photoshop enhances image quality without losing details. Traditional upscaling often makes images blurry or pixelated. AI-powered tools analyze the image and add missing details to keep it sharp and clear. This process helps photographers, designers, and hobbyists improve low-resolution images easily.
AI upscaling works by studying patterns in the image. It then generates new pixels to fill in the gaps. This leads to smoother edges and clearer textures. Photoshop includes built-in AI features that simplify upscaling tasks. Users can increase image size while maintaining professional quality.
What Is Ai Upscaling In Photoshop?
AI upscaling in Photoshop uses advanced algorithms to enlarge images. It predicts and reconstructs details instead of just stretching pixels. This technology reduces noise and sharpens the image. Photoshop’s AI tools automate the process, making it fast and simple.
Steps To Upscale Images Using Photoshop Ai
First, open your image in Photoshop and ensure it is updated. Next, select the image layer and go to the “Image Size” option. Choose the “Preserve Details 2.0” resample method. This uses AI to improve quality during resizing. Adjust the dimensions to the desired size. Finally, review the image and apply any needed touch-ups.
Best Practices For Ai Image Upscaling
Start with the highest quality original image possible. Avoid excessive enlargement to prevent artifacts. Use Photoshop’s noise reduction tools after upscaling if needed. Compare the before and after images to ensure quality. Save your work in a lossless format like PNG or TIFF.
Credit: dataconomy.com
Combining Ai Features For Creativity
Combining AI features in Photoshop opens new paths for creativity. You can mix different AI tools to craft unique images. This blend helps you work faster and explore ideas easily.
Using multiple AI options lets you enhance photos, add details, and change backgrounds smoothly. It gives more control over your creative process. The key is to use AI tools together in smart ways.
Using Generative Fill And Subject Selection Together
Start by selecting the main subject with AI-powered tools. Photoshop’s AI can detect and isolate subjects quickly. Then apply Generative Fill to add or remove elements around the subject. This method saves time and keeps edits clean.
Combining Generative Expand With Content-aware Fill
Generative Expand helps you grow your image canvas with AI creativity. After expanding, use Content-Aware Fill to blend new areas seamlessly. This combination creates natural extensions without extra manual work.
Enhancing Details With Generative Upscale And Neural Filters
Generative Upscale improves image resolution using AI technology. After upscaling, apply Neural Filters to enhance colors or textures. This duo sharpens photos and adds artistic effects quickly.
Tips For Effective Ai Use In Photoshop
Using AI in Photoshop can speed up your editing process and improve results. Simple tips help you use AI tools more effectively. These tips make your work smoother and more precise.
Follow these guidelines to get better results from Photoshop’s AI features. They help you save time and create high-quality images.
Use High-quality Images
Start with clear and detailed photos. AI works best with sharp images. Low-quality images may confuse AI and reduce output quality. Always choose good lighting and focus.
Understand Ai Tool Limits
AI is powerful but not perfect. Know what each tool can and cannot do. Avoid expecting AI to fix all problems. Use AI as a helper, not a replacement for skills.
Experiment With Different Settings
Try various AI options and settings. Small changes can create different effects. Testing helps you find the best look. Don’t hesitate to undo and retry.
Combine Ai With Manual Edits
AI works well with human touch. After AI edits, use manual tools to fine-tune. Adjust colors, sharpness, or details by hand. This improves final image quality.
Save Versions Frequently
Keep multiple file versions during editing. Save before and after AI changes. This lets you go back if results are not as expected. It prevents losing good work.
Saving And Sharing Ai-enhanced Work
Saving and sharing your AI-enhanced work in Photoshop is important. It protects your edits and lets you show your creativity to others. Photoshop offers simple ways to keep your files safe and ready for sharing. This section explains how to save your work properly and share it easily.
Saving Ai-enhanced Files In Photoshop
Use the standard save option to keep your project file. Choose the PSD format to save all layers and AI edits. This format allows you to reopen and change your work later.
Save often to avoid losing progress. Photoshop also has an auto-save feature for extra security. Name your files clearly to find them quickly.
Exporting For Sharing
Export your image to formats like JPEG or PNG for sharing. These formats are smaller and easy to upload online. Adjust the quality settings to balance file size and image clarity.
Use the Export As option to choose the best format for your needs. This step prepares your AI-enhanced image for websites, emails, or social media.
Using Cloud Storage And Collaboration Tools
Photoshop integrates with Adobe Creative Cloud for easy storage and sharing. Save your files to the cloud to access them anywhere. Share links with others to get feedback or collaborate.
Cloud storage keeps your AI-enhanced work safe and organized. Collaboration tools help teams work together smoothly on Photoshop projects.
Frequently Asked Questions
How Do I Use Ai In Photoshop?
Open Photoshop and update to the latest version. Import your image, then use AI tools like Generative Fill to add or remove content. Extend backgrounds or create new elements with text prompts. Finally, save and share your edited image.
How Do I Turn On Generative Fill In Photoshop?
Open Photoshop and update to the latest version. Select the area, then go to Edit > Generative Fill. Enter a prompt and click Generate.
Is There An Ai That Can Do Photoshop?
Yes, Adobe Photoshop uses AI tools like Generative Fill, Expand, and Upscale to edit images using text prompts quickly and easily.
Is Ai In Photoshop Free?
AI features in Photoshop require a paid Adobe subscription. Some trial versions may offer limited free access.
What Is Ai In Photoshop And How Does It Work?
AI in Photoshop uses smart tools to edit, enhance, and create images automatically.
How Do I Activate Generative Fill In Photoshop?
Go to the Edit menu and select Generative Fill to start using AI features.
Can Ai In Photoshop Remove Unwanted Objects From Photos?
Yes, AI can quickly detect and remove objects without harming the background.
How Does Ai Help Extend Images In Photoshop?
AI fills empty spaces by generating realistic content that matches the image style.
Is Ai Useful For Creating New Backgrounds In Photoshop?
Absolutely, AI can create or change backgrounds by generating new image areas.
What Are The Basic Steps To Use Ai In Photoshop?
Open Photoshop, import your image, select AI tools like Generative Fill, then edit.
Conclusion
Using AI in Photoshop makes editing faster and more creative. You can easily add or remove objects with simple text prompts. AI tools help extend images or change backgrounds without complex steps. Practice these features to improve your skills and save time.
Explore AI options and enjoy creating unique images today. Keep experimenting to discover new ways AI can enhance your Photoshop projects.