Want to keep your favorite recipes organized and easy to share? Making your own recipe cards is a simple and fun way to do just that.
Whether you love cooking family classics or experimenting with new dishes, having recipe cards lets you quickly find what you need without scrolling through endless notes or apps. Plus, personalized recipe cards add a special touch when gifting recipes to friends or preserving your culinary memories.
In this guide, you’ll discover easy steps to create beautiful, practical recipe cards that fit your style and kitchen needs. Ready to turn your recipes into handy cards you’ll actually use? Let’s get started!
Choosing Card Size
Choosing the right size for your recipe cards matters a lot. It affects how easy they are to use and store. The size also changes how much information fits on each card. Small cards are handy but may limit details. Bigger cards hold more text but take more space.
Think about where you will keep your cards. A size that fits your box or binder works best. Also, consider how you want to handle them while cooking. Cards that are too big can be awkward.
Standard Sizes For Recipe Cards
The most common sizes are 3×5 inches and 4×6 inches. The 3×5 size is compact and easy to flip through. It works well for simple recipes. The 4×6 size offers more room for detailed instructions and photos. Choose based on how much space your recipes need.
Customizing Card Size For Your Needs
Custom sizes allow more creativity. You can pick a size that fits your handwriting or design style. Larger cards are good if you like adding notes or tips. Smaller cards fit better in kitchen drawers or recipe boxes.
Consider Printing And Storage
Check if your printer supports the chosen card size. Standard sizes are easier to print at home. Also, think about how you will store the cards. Make sure the size fits your recipe box or binder perfectly.
Selecting Materials
Choosing the right materials is key to making recipe cards that last. The materials affect the look, feel, and durability of your cards. Focus on selecting paper and writing tools that match your style and needs.
Choosing The Paper Type
Pick paper that is sturdy and easy to write on. Cardstock is a popular choice because it is thick and holds up well. Glossy paper gives a shiny finish but can be hard to write on with some pens. Matte paper offers a smooth surface and reduces glare.
Selecting The Paper Size
The common size for recipe cards is 3 by 5 inches. This size fits well in most recipe boxes and is easy to handle. Larger sizes like 4 by 6 inches provide more space for writing but may not fit all holders. Choose a size that fits your storage method.
Picking Writing Tools
Use pens or markers that do not smudge. Permanent ink pens work well on most paper types. Avoid gel pens on glossy paper as they may take longer to dry. Colored pens can help organize different parts of the recipe, like ingredients and instructions.
Considering Additional Materials
Decorative elements like stickers or stamps can add a personal touch. Laminating the cards protects them from spills and tears. Use a corner rounder punch to prevent bent corners and give a polished look.
Designing Layouts
Designing layouts for recipe cards is a crucial step. A good layout helps readers follow the recipe easily. It also makes your recipe card look attractive and organized. Simple and clear designs work best for all users.
Focus on dividing the card into sections. Each section should have a specific purpose. For example, one for the title, one for ingredients, and another for instructions. This separation makes the card easy to read and use.
Choosing The Right Size And Shape
Pick a size that fits your needs. Common sizes are 3×5 inches or 4×6 inches. Square or rectangular cards work well. Make sure the card is big enough to hold all information without crowding.
Using Clear Fonts And Colors
Select fonts that are simple and easy to read. Avoid fancy or script fonts that might confuse readers. Use dark text on a light background for better visibility. Keep colors calm and consistent to avoid distractions.
Organizing Content With Sections
Divide the card into clear sections. Start with the recipe title at the top. List ingredients next, followed by step-by-step instructions. You can add small boxes or lines to separate each part. This helps the eye move naturally through the card.
Adding Visual Elements
Include small images or icons if space allows. A photo of the finished dish adds appeal. Icons can show cooking time or difficulty level. Use visuals sparingly to keep the card neat and clean.
Using Templates
Using templates simplifies the process of making recipe cards. Templates provide a ready-made design you can customize. They save time and help keep your cards neat and consistent.
Templates often include sections for ingredients, instructions, and cooking times. This organization makes your recipes easy to read and follow. You can find templates online or use built-in options in programs like Microsoft Word or Canva.
How To Find Recipe Card Templates
Search for recipe card templates in your favorite design software. Many websites offer free and paid templates. Choose one that matches your style and the size of your cards. Check if the template allows easy editing of text and images.
Customizing Template Sections
Edit the template by replacing placeholder text with your own recipe details. Add the recipe name, ingredients, and step-by-step instructions. Adjust font styles and sizes to improve readability. Use colors that make your card attractive but clear.
Saving And Printing Your Recipe Cards
Save your customized recipe card as a PDF for best printing quality. Print on sturdy cardstock for durability. Test print on regular paper to check layout and spacing. Cut the cards carefully to match the template size.
Adding Text Elements
Adding text elements to your recipe cards brings clarity and style. Text guides readers through your recipe step-by-step. Clear text makes your recipe easy to follow.
Choose simple fonts that are easy to read. Keep font size large enough for quick reading. Use bold or italics to highlight important parts.
Using Headings For Organization
Headings separate sections like ingredients and instructions. Use different font sizes or colors for each heading. This helps readers find information fast.
Writing The Recipe Title
The title should be clear and catchy. Place it at the top center of the card. Use a larger font size to make it stand out.
Listing Ingredients Clearly
List ingredients in order of use. Use bullet points or numbers for neatness. Keep ingredient names short and simple.
Formatting Instructions Step-by-step
Break instructions into short, numbered steps. Use simple sentences for easy understanding. Leave space between steps for a clean look.
Adding Extra Details
Add cooking time, servings, and tips at the bottom. Use smaller font size to separate these from the main text. This keeps the card organized and informative.
Incorporating Images
Images bring recipe cards to life. They show what the dish looks like. Pictures catch the reader’s eye and make the recipe more inviting. Adding images helps cooks feel confident about trying a recipe. They also add a personal touch that words alone cannot provide.
Choosing the right image is important. The photo should be clear and bright. Use natural light for the best effect. Avoid blurry or dark pictures because they distract from the recipe’s appeal. A well-shot image makes your card look professional and attractive.
Choosing The Best Image For Your Recipe Card
Select images that show the finished dish clearly. The food should look fresh and tasty. Use close-up shots to highlight details like texture and color. Make sure the background is simple to keep focus on the food. Avoid cluttered or busy backgrounds that confuse the viewer.
How To Insert Images Into Your Recipe Cards
Use photo editing tools to resize images before inserting. Keep the image size balanced with text to maintain readability. Place images near the title or ingredients section for visual interest. Use the “Insert” option in your editing software to add pictures easily. Align images properly to create a neat layout.
Tips For Editing Recipe Card Images
Crop images to remove unnecessary parts. Adjust brightness and contrast to enhance colors. Use filters sparingly to keep food looking natural. Save images in a high-quality format like JPEG or PNG. Avoid large file sizes that slow down loading or printing.
Customizing Fonts And Colors
Customizing fonts and colors transforms plain recipe cards into personal keepsakes. These design choices make each card unique and easier to read. Simple changes can highlight important details like recipe titles or ingredients.
Choosing the right font style and size sets the tone of your recipe card. Soft, rounded fonts feel friendly. Bold fonts catch the eye quickly. Color choices add mood and clarity. Light backgrounds with dark text improve readability.
Choosing The Perfect Font Style
Select fonts that match your recipe’s theme. For traditional recipes, serif fonts work well. For modern dishes, try clean sans-serif fonts. Avoid using too many different fonts. Stick to one or two for a neat look.
Adjusting Font Size For Readability
Use larger fonts for titles to make them stand out. Keep ingredient lists and instructions smaller but clear. Make sure text is not too small to read easily. Test your cards by printing a sample.
Selecting Colors That Complement Your Design
Pick colors that fit the mood of your recipe. Warm tones like reds and oranges suit spicy dishes. Cool blues and greens work well for fresh or healthy meals. Use contrasting colors for text and background to improve visibility.
Applying Color Consistency Across Cards
Keep colors consistent if making a set of recipe cards. Use the same font colors for titles and ingredients. This consistency creates a cohesive look. It also helps when searching for a recipe quickly.
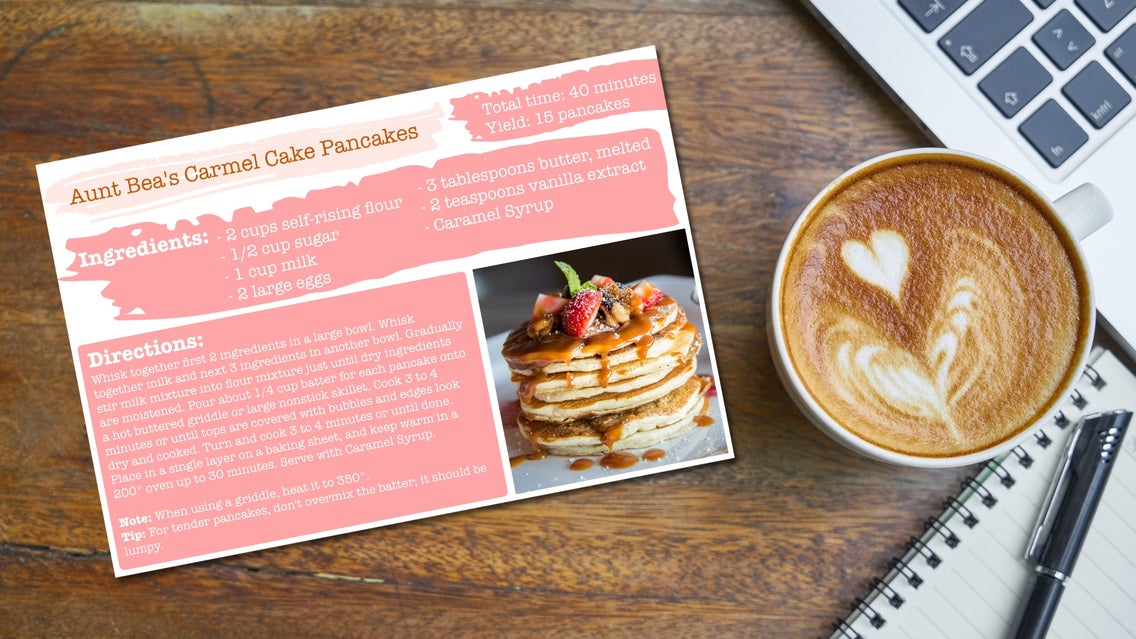
Credit: www.befunky.com
Printing Tips
Printing recipe cards correctly ensures they look professional and last long. Choosing the right paper and printer settings makes a big difference. Follow these simple printing tips for the best results.
Choose The Right Paper
Use thick cardstock for sturdy recipe cards. A weight of 80-110 lb works well. Avoid thin paper that bends or tears easily. Matte finish reduces glare and makes writing easier. Glossy paper looks shiny but can smudge ink.
Set Proper Page Size
Standard recipe cards are 3 by 5 inches or 4 by 6 inches. Adjust your printer settings to match these sizes. This helps avoid cutting errors. Use custom page size in your print dialog box for accuracy.
Use High-quality Printer Settings
Select “Best” or “High” print quality for clear text and images. Choose color printing if your design has colors. Use “Photo Paper” or “Cardstock” mode if your printer supports it. This setting controls ink flow for thick paper.
Print A Test Page
Always print one test card on regular paper first. Check alignment and colors. Make sure all text fits inside the card area. Adjust margins or font size if needed. This saves paper and ink.
Allow Ink To Dry
Let your cards dry for a few minutes after printing. Avoid stacking cards immediately to prevent smudges. Use a clean, flat surface for drying. This keeps your cards neat and professional.
Organizing Cards
Organizing your recipe cards makes cooking easier and more fun. A well-arranged collection saves time and reduces kitchen stress. It helps to find recipes quickly and keep your favorites handy.
Sorting Cards By Category
Group cards by meal type, such as breakfast, lunch, or dinner. Another way is by main ingredient like chicken, vegetables, or pasta. Use clear labels or tabs for each category. This method keeps your cards neat and easy to browse.
Using A Recipe Box Or Binder
A sturdy recipe box protects cards from spills and damage. Choose a box with dividers to separate categories. Binders with plastic sleeves also work well. They allow easy addition and removal of cards without wear.
Numbering And Indexing Recipes
Assign numbers to each recipe card for quick reference. Create an index sheet listing recipe names and their numbers. This system helps locate cards fast, especially in a large collection. Keep the index near your recipe storage for convenience.
Keeping Cards Clean And Durable
Print or write recipes on thick cardstock to prevent tearing. Consider laminating cards to protect from water and stains. Use waterproof pens or markers if writing by hand. Clean cards last longer and look better over time.

Credit: www.aliceandlois.com
Preserving And Sharing
Preserving and sharing your recipe cards keeps your favorite meals alive. It helps pass down family secrets and traditions. Well-kept recipe cards become treasures for future cooks. Sharing them spreads joy and inspires others in the kitchen.
Preserving Your Recipe Cards
Use durable materials like cardstock or laminated paper. Keep cards in a cool, dry place to avoid damage. Store them in a box or recipe binder for easy access. Write clearly with waterproof pens to prevent smudging. Consider scanning cards to create digital backups.
Sharing Recipe Cards With Family And Friends
Make copies of your cards to share without losing originals. Send digital versions through email or social media for quick sharing. Gift handmade recipe cards as thoughtful presents. Host recipe exchanges to discover new dishes and stories. Sharing builds connections and keeps traditions alive.

Credit: scrapbookcampus.com
Frequently Asked Questions
How To Make A Recipe Card At Home?
To make a recipe card at home, choose a 3×5-inch card, write the recipe title, ingredients, and steps clearly. Use cardstock for durability. Add decorative elements or images if desired. Store cards in a box or binder for easy access and sharing.
How To Create Recipe Cards In Word?
Open Word, go to File > New, search “recipe,” and select a template. Customize text and save. Alternatively, insert text boxes or tables, add recipe details, format, and print on cardstock.
Does Google Docs Have A Recipe Card Template?
Google Docs does not offer a built-in recipe card template. Users create cards using tables or text boxes.
What Technique Is Best For Writing A Recipe Card?
The best technique for writing a recipe card uses clear sections for title, ingredients, and instructions. Use text boxes or tables for organization. Keep sentences short and formatting simple. Add images optionally. Save and print on cardstock for durability. Templates in Word or Canva simplify the process.
What Materials Do I Need To Make Recipe Cards?
You need cardstock, a pen or printer, and optionally a box to store cards.
How Do I Design Recipe Cards At Home?
Use paper or cardstock, write or print recipe details neatly on cards.
Can I Make Recipe Cards Using Microsoft Word?
Yes, use Word templates or text boxes to create and print cards easily.
What Size Is Best For Recipe Cards?
A common size is 3×5 inches, easy to handle and store in boxes.
How Do I Organize Information On Recipe Cards?
Separate sections for title, ingredients, instructions, and cooking time work well.
Can I Add Pictures To My Recipe Cards?
Yes, adding photos makes cards visually appealing and helps identify recipes faster.
Conclusion
Making your own recipe cards keeps favorite meals close and easy to share. Simple tools like Word or paper work well. Customize cards to fit your style and cooking needs. Write clearly and organize ingredients and steps neatly. Store cards in a box or binder for quick access.
This helps keep recipes safe and ready for any cooking day. Enjoy creating and passing down your special recipes with loved ones.