If you want your ideas, products, or inspiration to stand out on Pinterest, knowing how to make eye-catching pins is key. Your pins are the gateway to driving traffic, gaining followers, and boosting your presence online.
But creating pins that grab attention and inspire clicks doesn’t have to be complicated or time-consuming. In this guide, you’ll discover simple, step-by-step tips to design pins that speak directly to your audience, encourage engagement, and help you get the results you want.
Ready to turn your Pinterest profile into a powerful tool? Let’s dive in and start crafting pins that really work for you.
Credit: www.retroden.com
Pinterest Pin Basics
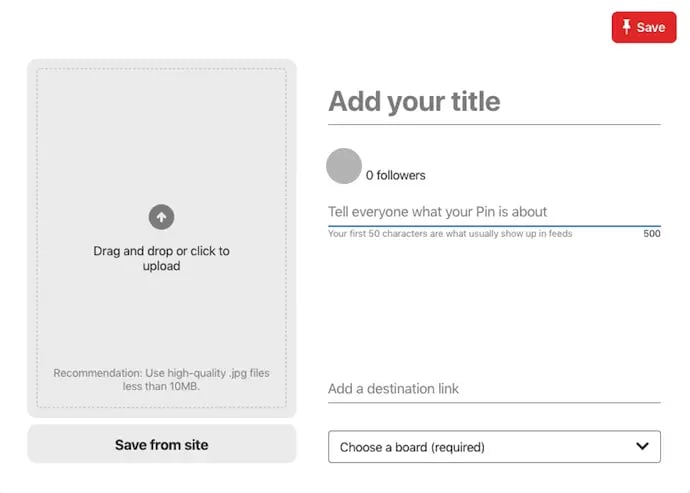
Creating Pinterest pins starts by logging into your account and clicking the “Create” button. Upload an image or video, add a title and description, then choose a board to save your pin. Finally, click “Publish” to share your pin with others.
Pinterest pins are the core of your content on the platform. They help you share ideas, products, and inspiration. Understanding the basics makes creating effective pins easier and faster.
Each pin contains an image or video, a title, a description, and a link. Pins are saved to boards, which organize your content by topic or theme. Well-made pins attract more viewers and increase engagement.
How To Upload Images Or Videos
Start by choosing a clear and attractive image or video. Upload files from your computer or mobile device. You can also drag and drop files into the upload area on desktop.
Images should be vertical, with a recommended size of 1000 by 1500 pixels. Videos can be up to 15 minutes long. Make sure your visuals look good and stand out.
Writing Titles And Descriptions
Use simple and direct language for your pin titles. Titles should describe the content clearly in about 30 to 40 characters. Descriptions give more details and can include keywords.
Include words people might use to search for your pin. This helps your pin appear in relevant searches. Keep descriptions under 500 characters and easy to read.
Selecting Boards For Your Pins
Boards organize your pins by topics. Choose a board that matches your pin’s content. If no board fits, create a new one with a clear name.
Saving pins to the right board helps people find your content faster. It also keeps your profile neat and organized.
Publishing Your Pin
After adding all details, review your pin. Check the image, title, description, and board selection. Click the “Publish” button to share your pin with others.
Business accounts can schedule pins to post later. This helps keep your profile active without manual posting every day.
Credit: blog.hubspot.com
Choosing Pin Dimensions
Choosing the right pin dimensions is vital for Pinterest success. Pins with proper size look good and attract more viewers. Pinterest favors vertical pins that stand out in feeds. Using the correct dimensions helps your pins avoid being cut off or blurry.
Different pin sizes work better for certain content types. Knowing these sizes lets you design pins that fit Pinterest’s layout perfectly. This improves engagement and increases chances of repinning and clicks.
Recommended Pinterest Pin Size
The best size for a Pinterest pin is 1000 pixels wide by 1500 pixels tall. This 2:3 aspect ratio fits Pinterest’s display perfectly. Pins with this size appear clear and take up enough space to catch attention.
Keeping this size consistent helps maintain a clean and professional profile look. It also avoids Pinterest resizing your image, which can lower quality.
Maximum And Minimum Pin Dimensions
Pinterest accepts pins with a minimum width of 600 pixels. Pins smaller than this may look pixelated or lose detail. The maximum height Pinterest recommends is 2100 pixels.
Very tall pins longer than 2100 pixels may be cut off or not fully shown. Staying within these size limits ensures your pins display properly on all devices.
Choosing Dimensions For Different Content Types
Product pins, blog graphics, and tutorials each work best with vertical pins. Use the 2:3 ratio for most content. For infographics, you can go taller but keep below 2100 pixels height.
Square pins (1000 x 1000 pixels) also work but may not stand out as much. Horizontal pins often get less engagement and can appear smaller in feeds.
Selecting Eye-catching Images
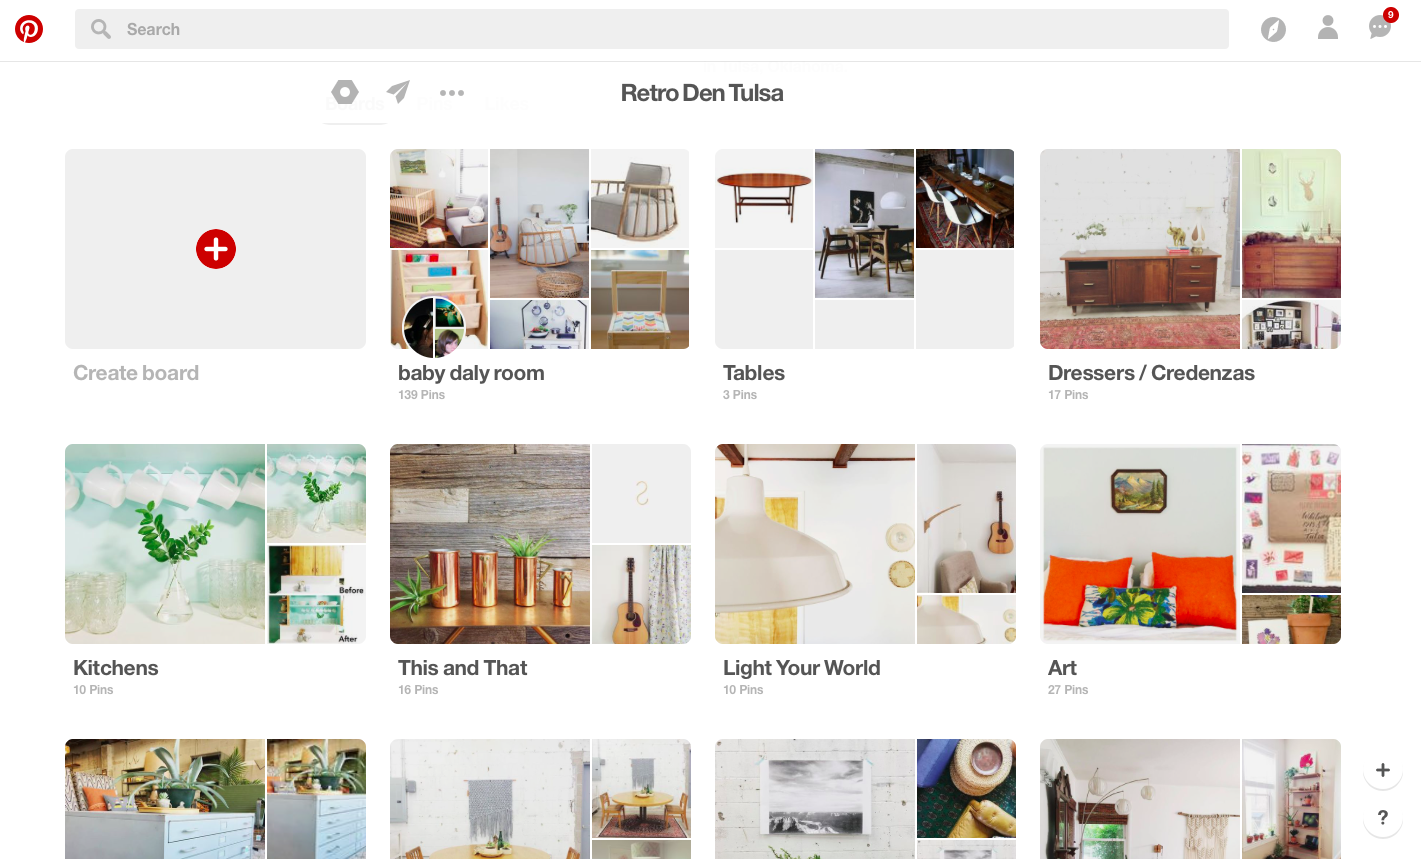
Organizing your Pinterest pins with boards helps keep your content neat and easy to find. Boards group similar pins together, making your profile look clean and professional. This also helps visitors discover related ideas quickly. Proper organization improves your Pinterest experience and can increase engagement on your pins.
Creating Boards For Different Topics
Create separate boards for each topic or theme you want to share. For example, if you pin recipes, create boards for desserts, breakfast, and dinners. This way, your pins stay sorted and your followers find what they want fast. Choose clear, simple board names for easy understanding.
Adding Pins To The Right Boards
Always save your pins to the most relevant board. This keeps your profile organized and helps Pinterest show your pins to the right audience. Before publishing a pin, select the board that matches its content. This small step improves your pin’s visibility and user experience.
Using Board Sections For More Detail
Board sections divide a board into smaller parts. For example, a “Travel” board can have sections like “Beaches,” “Mountains,” and “Cities.” Sections help organize pins inside a board, so everything stays tidy. They make it easier for viewers to browse specific interests within one board.
Credit: meetedgar.com
Crafting Compelling Titles
Design tools make creating Pinterest pins simple and effective. They help craft eye-catching visuals that attract clicks and saves. Using the right tools improves your pin’s look and reach.
Many design tools offer templates tailored for Pinterest’s vertical format. These templates help maintain the perfect size and style. You can customize colors, fonts, and images to match your brand.
Choosing The Right Design Tool
Pick a tool that fits your skill level and needs. Canva is popular for beginners and offers many free templates. Adobe Spark suits users wanting more advanced features. Both have drag-and-drop interfaces for easy design.
Using Templates For Faster Pin Creation
Templates save time and keep pins consistent. Start with a template and change images and text. This method ensures your pins look professional without much effort. Templates often include space for titles and calls to action.
Adding Text And Branding
Text on pins should be clear and easy to read. Use bold fonts and contrasting colors for better visibility. Add your logo or website link to build brand recognition. Keep the design simple to avoid clutter.
Optimizing Images For Pinterest
Use high-quality images with good lighting and focus. Pinterest prefers vertical pins with a 2:3 aspect ratio, like 1000×1500 pixels. Avoid blurry or pixelated images, as they reduce engagement. Bright and colorful images often perform best.
Writing Descriptions That Convert
Scheduling and publishing pins is key to maintaining an active Pinterest presence. It helps share your content at the best times for your audience. This process also saves time by planning posts in advance. Smart scheduling can increase the visibility of your pins and drive more traffic to your boards.
Using Pinterest’s Native Scheduler
Pinterest offers a built-in scheduler for business accounts. After creating a pin, select the option to publish later. Choose the date and time that fits your posting plan. This keeps your profile fresh without needing to post manually every day.
The scheduler is easy to access and use. It shows upcoming pins and lets you adjust or delete them. This tool works well for simple schedules and small batches of pins.
Third-party Scheduling Tools
Third-party tools provide more features than Pinterest’s native scheduler. Platforms like Tailwind or Buffer allow bulk pin uploads and detailed analytics. They help plan pins across multiple boards and accounts.
These tools can suggest the best times to post based on your audience’s activity. They also offer drag-and-drop calendar interfaces, making it simple to organize your content schedule.
Best Practices For Publishing Pins
Post pins during peak hours for more engagement. Experiment with different times to find what works best. Keep a regular posting schedule to build consistency.
Use clear titles and descriptions that include keywords. Add a direct link to your website or blog. Choose the most relevant board to reach interested users.
Frequently Asked Questions
How Do I Make My Own Pin On Pinterest?
Log in to Pinterest and click “Create” then “Create Pin. ” Upload an image or video, add title, description, and link. Choose a board, then click “Publish” to share your pin.
How Is Gen Z Using Pinterest?
Gen Z uses Pinterest to find inspiration, explore trends, plan events, and discover creative ideas. They engage with visuals, save pins, and share content regularly. Pinterest helps them express interests, learn new skills, and shop for products through personalized boards and searches.
Can I Make Money On Pinterest By Creating Pins?
Yes, you can earn money on Pinterest by creating pins that drive traffic to your products or affiliate links. Consistent, engaging pins boost sales and commissions.
How To Make A Pin On Pinterest With Multiple Pictures?
Log in to Pinterest and click “Create Pin. ” Upload multiple images using the carousel feature. Add title, description, link, choose a board, then publish your multi-image pin.
What Is A Pinterest Pin?
A Pinterest pin is an image or video saved on Pinterest to share ideas or products.
How Do I Create A Pinterest Pin?
Log in, click “Create,” upload image/video, add title, description, link, and publish.
What Size Should My Pinterest Pin Be?
Use vertical images, ideally 1000 x 1500 pixels for best display and engagement.
Can I Add Links To My Pinterest Pins?
Yes, add a website link so users can visit your site from the pin.
Which Tools Help Make Pinterest Pins Easily?
Canva, Adobe Spark, and Pinterest’s own editor are great for creating pins.
How Do I Choose A Board For My Pinterest Pin?
Pick a board that matches your pin’s topic or create a new relevant board.
Conclusion
Creating Pinterest pins is simple and effective for sharing ideas. Choose clear images and write short, catchy titles. Add descriptions that explain your pin well. Link your pins to useful websites or blogs. Save pins to boards that match the topic.
Use both desktop and mobile tools to create pins easily. Practice often to improve your pin-making skills. Consistent effort helps attract more viewers to your pins. Start pinning today and enjoy sharing your creativity with others.