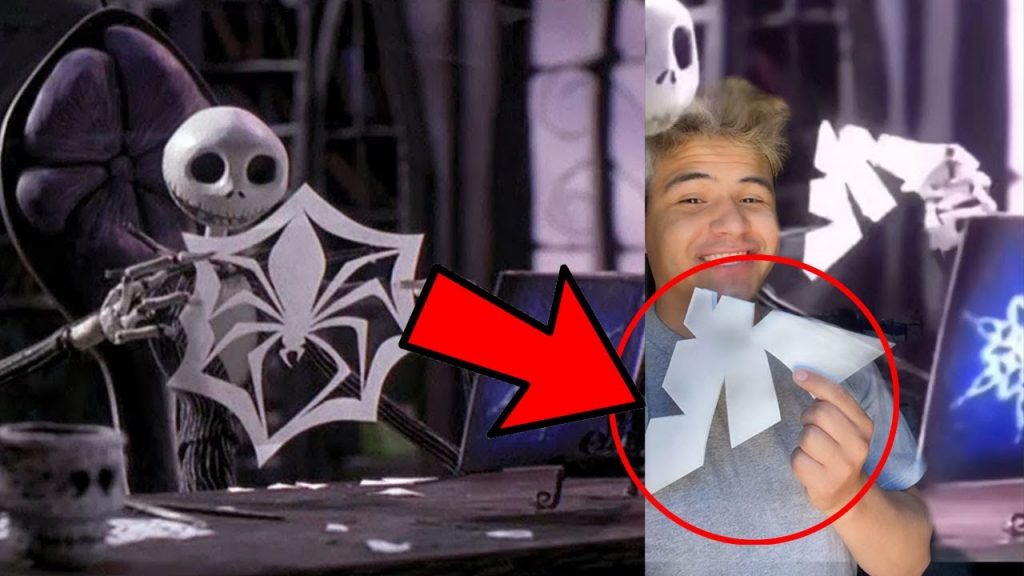
To make a Jack Skellington spider snowflake, you will need black and white construction paper, scissors, glue, and glitter. First, cut out a large oval shape from the black construction paper. This will be the body of your spider.
Next, cut out eight small oval shapes from the white construction paper. These will be the legs of your spider. Glue the legs onto the body of your spider.
Then, decorate your spider with glitter to make it extra spooky!
- Cut a Jack Skellington template out of black construction paper
- Trace the template onto a piece of white paper
- Cut out the Jack Skellington shape from the white paper
- Glue the Jack Skellington shape onto a piece of black construction paper
- Cut eight small triangles out of the black construction paper to create spider legs
- Glue four spider legs on each side of the Jack Skellington body so that they are evenly spaced apart
- 7 Let the glue dry completely before hanging your snowflake up!
How to Make a Spider Snowflake – Inspired by Jack Skellington – Paper Craft and Template
Paper Snowflake
Paper snowflakes are a fun and easy craft that you can do with your kids. They’re also a great way to decorate for the holidays. Here’s how to make them:
1. Start with a square piece of paper. Fold it in half diagonally to create a triangle.2. Fold the triangle in half again, and then fold it in half one more time.
You should now have a small triangle with four layers of paper.3. Using scissors, cut out shapes along the folded edges of the paper. Be creative!
You can make different patterns or even write words on your snowflake. Just be sure not to cut all the way through to the other side of the paper – you want your snowflake to stay together when you unfold it later.4..
Once you’re happy with your design, carefully unfold the paper until you have a flat square again. Then, gently separate each layer of paper so that your snowflake is fluffy and three-dimensional. Hang up your beautiful creation and enjoy!

Credit: www.instructables.com
How Do You Make a Paper Spider?
Assuming you would like instructions on how to make a paper spider:You will need:
-1 sheet of black construction paper
-2 sheets of white construction paper
-Scissors
-Glue stick or tape
-Pen or pencilInstructions:
1. On the black piece of construction paper, draw a large oval in the center.
This will be the spider’s body. Then, add eight small ovals around the big oval. These will be the legs.
Cut out all the shapes.2. Glue the two white pieces of construction paper together at the short ends so that they form one long sheet. Then, cut this sheet into eight strips that are about 1 inch wide and 12 inches long.
3. Take one strip and glue it to the back of one of the spider’s legs, starting at the top of the leg and going all the way down to the bottom. Repeat this step for each leg.4. Finally, turn over your spider so that the legs are facing down and glue on two googly eyes near the top of the body (on either side).
Your spider is now complete!
How Do You Cut a Snowflake Out of Paper?
When it comes to cutting snowflakes out of paper, there are a few things you’ll need: a sharp pair of scissors, some white paper, and a bit of patience. Here are the steps to follow:1. Start by folding your piece of paper in half lengthwise.
Then fold it in half again. You should now have a long, thin rectangle.2. Make several cuts along the folded edge of the paper, being careful not to cut all the way through.
The more cuts you make, the more intricate your snowflake will be.3. Unfold the paper and take a look at your handiwork! You should now have a strip of paper with lots of little “teeth” along one side.
4. To turn this into a snowflake, simply fold the strip in half and then twist it into a spiral shape. Once you’re happy with how it looks, snip off one end and tape the other end down so that your snowflake stays put.And that’s all there is to it!
How Do You Cut a Snowflake Out of a Bat?
Assuming you want tips on how to cut a snowflake out of paper:There are many ways to fold and cut a sheet of paper into a beautiful snowflake. The most important part is to be precise with your folds and cuts so that each flake is symmetrical.
Follow these steps for the perfect paper snowflake:1. Start with a square sheet of paper. If you don’t have square paper, simply fold one corner diagonally until it meets the opposite edge and trim off the excess.
2. Fold the paper in half horizontally, then in half again vertically so that you have a smaller square. Crease well and unfold.
3. Make another horizontal fold, but this time only bring the top edge down about two-thirds of the way towards the bottom edge.
Unfold again.
4. For your final fold, make a vertical accordion fold by folding the left side towards the right side, making sure that the folds are about 1 inch (2.5 cm) apart as you go along. When you’re done, crease well and unfold completely so that you have a long strip of folded paper resembling an accordion or fan shape.
.
5 . Using sharp scissors, cut along both edges of your strip at regular intervals to create fringe all along both sides.
.
6 Hold one end of your strip lightly between your thumb and forefinger and begin curling it round into itself to form a tight spiral shape..
As you go along, tuck the fringe underneath itself so that it’s hidden inside..When you reach the end of your strip, glue or tape it down to secure..
7 Finally, snip off any stray bits of fringe sticking out from around the edge of your flake and admire your handiwork!
How Do You Make a Snowflake Out of Paper And Scissors?
To make a snowflake out of paper, you will need to start with a square piece of paper. Fold the paper in half diagonally to create a triangle, then fold the triangle in half again to create a smaller triangle. Next, cut off the bottom corner of the triangle so that you have a long, skinny triangle shape.
Make sure not to cut too close to the edge or your snowflake will be too small.Now it’s time to start cutting! On one side of your triangle, start cutting small slits into the paper about 1/2 inch apart.
The closer together your cuts are, the more detailed your snowflake will be. Once you’ve made several cuts on one side of the paper, fold down every other slit so that it lines up with the center crease of your triangle (see photo). Now turn your paper over and repeat this step on the other side.
When you’re finished cutting and folding both sides of your paper, gently unfold all of your slits until they lay flat. You should now have a beautiful snowflake! If desired, you can add glitter or color to give it some extra pizzazz.
Conclusion
If you’re a fan of the Nightmare Before Christmas, then you’ll love this tutorial on how to make a Jack Skellington spider snowflake. This easy-to-follow guide will show you everything you need to know, from what materials to use to how to put it all together. You’ll be crafting your very own Jack Skellington spider snowflakes in no time!