Are you tired of spending hours struggling to design a presentation that looks professional and grabs attention? Imagine creating stunning slides quickly, without any design skills.
With Canva, you can do just that—turn your ideas into beautiful presentations that engage your audience from start to finish. Whether you’re preparing for a work meeting, a school project, or a special event, this powerful tool makes it easy to create, customize, and share your presentation exactly the way you want.
Ready to transform your next presentation into something unforgettable? Let’s dive into how you can create a presentation with Canva step by step.
Credit: www.canva.com
Choosing A Template
Choosing the right template is the first step to create a stunning presentation with Canva. Templates set the tone and style of your slides. They also save time by providing a ready-made design. Canva offers a wide range of templates for various topics and purposes.
Selecting a suitable template helps keep your presentation clear and consistent. It also makes your content easier to follow. Picking a template that matches your message improves audience engagement.
Browse Canva’s Template Library
Canva’s template library contains thousands of options. You can search by keywords or categories. Filters help narrow down choices by style, color, or theme. Preview templates before selecting to see their design and layout.
Match Template To Your Presentation Topic
Choose a template that fits your subject and audience. For business, pick professional and clean designs. For creative topics, try colorful and bold templates. Matching templates to your topic strengthens your message.
Consider Layout And Slide Variety
Look for templates with diverse slide layouts. Different slide types let you present text, images, charts, and more. A good template offers balance and variety. This keeps your presentation interesting and dynamic.
Check Customization Options
Ensure the template allows easy customization. Change colors, fonts, and images to fit your brand or style. Templates that are flexible save time and let you personalize content. Customization helps your presentation feel unique.
Using Magic Design
Using Magic Design in Canva simplifies presentation creation. This tool uses AI to help build slides fast. It suggests layouts and designs based on your text input. You do not need to start from scratch or spend hours designing.
Magic Design saves time and improves creativity. It offers professional-looking slides that fit your topic. Even beginners can create eye-catching presentations easily.
How To Access Magic Design
First, open Canva and log into your account. On the homepage, find the “Canva AI” section. Click on “Design for me” to start. Choose “Presentation” as your design type. Then, type a brief description of your presentation topic. Canva will generate slide options based on your text.
Customizing Ai-generated Slides
After choosing a slide set, you can edit any element. Change the text to match your message. Replace images with your own or use Canva’s library. Adjust colors and fonts to fit your style. Each slide is fully editable, giving you creative control.
Benefits Of Using Magic Design
Magic Design speeds up the presentation process. It reduces the need for design skills. The AI helps maintain a consistent look throughout slides. This tool supports clear communication of your ideas. It also inspires new ways to present your content.
Starting From Scratch
Starting from scratch in Canva lets you create a unique presentation. You have full control over every slide. This approach suits those who want a fully custom look. It avoids preset designs and allows creativity to flow freely.
You begin with a blank canvas. No distractions or preset elements. Just an empty space to build your ideas. This method helps you focus on your message and design style.
Accessing A Blank Presentation
Log in to your Canva account. On the homepage, type “Presentation” in the search bar. Select “Create a blank presentation” from the options. This opens a new project with empty slides. You can add as many slides as you need.
Choosing Slide Dimensions
Before designing, set your slide size. Canva offers standard sizes like 16:9 or 4:3. Pick the one that fits your presentation needs. Custom sizes are also available for special formats. Correct dimensions ensure your slides display well on any device.
Adding And Customizing Elements
Start adding text boxes, images, and shapes. Use Canva’s drag-and-drop tools to place elements easily. Customize fonts, colors, and sizes to match your style. Keep slides simple and clear for better audience understanding.
Saving And Organizing Slides
Save your work regularly to avoid data loss. Name each slide or section for easy navigation. Use Canva’s folder system to organize presentations. This keeps your project neat and accessible for future edits.
Customizing Fonts And Colors
Customizing fonts and colors is key to making your Canva presentation unique and eye-catching. These elements set the tone and mood of your slides. They help your message stand out clearly.
Choosing the right font style and color palette can improve readability. It also keeps your audience engaged throughout the presentation. Canva offers many options to tailor fonts and colors to your needs.
Changing Font Styles In Canva
To change fonts, select the text box you want to edit. Click the font dropdown menu at the top of the editor. You will see a wide variety of font styles, from classic to modern.
Pick a font that matches your presentation’s theme. Use bold or italic styles for emphasis. Keep font sizes consistent for headings and body text. This creates a clean and professional look.
Selecting Colors For Your Presentation
Canva allows you to pick colors for text, backgrounds, and shapes. Click on the element you want to color. Then, open the color picker tool in the toolbar.
Use brand colors or choose from Canva’s color palettes. Make sure there is enough contrast between text and background. This ensures your slides are easy to read.
Applying Consistent Fonts And Colors Across Slides
Maintaining consistency in fonts and colors helps unify your presentation. Use Canva’s “Styles” feature to apply the same font and color scheme to all slides. This saves time and keeps your design cohesive.
Review your slides to check for any font or color mismatches. Adjust as needed to create a polished final presentation.
Adding Images And Videos
Adding images and videos to your Canva presentation makes it more lively and engaging. Visual content grabs attention and helps explain your ideas clearly. Canva offers simple tools to upload, edit, and place images and videos exactly where you want them.
Using images and videos breaks up text and keeps your audience interested. It also helps to illustrate your points better. Canva’s drag-and-drop interface makes adding these elements quick and easy, even for beginners.
Uploading Your Own Images And Videos
Start by clicking the “Uploads” tab on the left panel. You can drag files from your computer or click “Upload media” to select images and videos. Canva supports many file types like JPG, PNG, MP4, and GIF. Once uploaded, just drag your chosen image or video onto the slide. Resize and move it to fit your design perfectly.
Using Canva’s Stock Library
Canva has a vast library of free and paid images and videos. Click on the “Photos” or “Videos” tab on the left side. Enter keywords to find visuals that match your topic. Drag your selected stock image or video onto the slide. This library saves time and provides high-quality content for your presentation.
Editing Images And Videos
After placing an image or video, use Canva’s editing tools. Adjust brightness, contrast, and saturation to improve images. Crop or flip visuals to fit your layout. For videos, trim length or mute sound if needed. These simple edits help your visuals look professional and polished.
Incorporating Charts And Graphs
Charts and graphs make presentations clearer and more engaging. They help explain data fast. Visuals catch attention and make your message strong. Canva offers easy tools to add these visuals to slides. You can create different types of charts with just a few clicks. This section shows how to add charts and graphs in Canva presentations.
How To Add Charts In Canva
Open your presentation in Canva. Click on the “Elements” tab on the left side. Scroll down to find “Charts”. Click it to see chart options. Choose from bar, line, pie, or other charts. Click your preferred chart to add it to the slide. Resize or move it as needed.
Customizing Your Charts
Click the chart to open the editor. Enter your data in the table that appears. Change colors to match your presentation style. Adjust fonts and sizes for labels and numbers. Canva updates the chart automatically with your changes. Make sure the chart is easy to read and looks neat.
Using Graphs For Better Storytelling
Graphs show trends and comparisons clearly. Use line graphs for progress or changes over time. Pie charts work well for showing parts of a whole. Bar charts compare different groups side by side. Choose the graph type that best fits your data story. Keep your graphs simple to avoid confusion.
Tips For Effective Chart Design
Use contrasting colors for clarity. Label all axes and sections clearly. Avoid overcrowding the slide with too many charts. Keep data precise and up to date. Align charts properly with other slide elements. Test your presentation to ensure charts display well on screen.
Applying Animations And Transitions
Applying animations and transitions in Canva makes presentations more lively and engaging. These effects help highlight key points and keep the audience’s attention focused. Animations control how elements appear or move on a slide. Transitions create smooth changes between slides. Both add a professional touch to your presentation.
Canva offers easy tools to add these effects. You can choose from different animation styles and transition types. Adjusting the timing and order lets you control how your slides flow. This section explains how to use animations and transitions effectively in Canva.
How To Add Animations To Elements
Select the text, image, or graphic you want to animate. Click the “Animate” button in the top toolbar. A panel appears with animation options like fade, slide, pop, and more. Click an animation to preview it on your element. Choose the style that fits your message best. Adjust the speed and direction if available. This makes your slide more dynamic and interesting.
Applying Transitions Between Slides
Go to the slide sorter or the slide thumbnail area. Select the slide you want to add a transition to. Click the “Transitions” button above the slides. Choose from options like dissolve, slide, wipe, and cube. Preview the transition effect on your slides. Set the duration for how fast the transition happens. This creates smooth movement from one slide to the next.
Tips For Using Animations And Transitions
Use animations sparingly to avoid distraction. Pick effects that suit your presentation style. Keep transitions consistent across slides for a clean flow. Test your presentation to check timing and smoothness. Simple animations often work best for clear communication. This helps maintain a professional and engaging presentation.

Credit: www.canva.com
Using Ai Features
Using AI features in Canva makes creating presentations faster and easier. These tools help generate ideas, design slides, and improve content automatically. You can focus more on your message and less on formatting.
Ai-powered Slide Generation
Canva’s AI can create entire slide decks from simple text prompts. Just describe your topic, and it suggests slide layouts and content. This saves time and provides a solid starting point for your presentation.
Smart Text Suggestions
The AI helps improve your text by offering better phrases and correcting grammar. It keeps your message clear and professional without extra effort. This feature is perfect for users who want quick content polishing.
Automatic Image And Design Suggestions
Canva’s AI suggests relevant images, icons, and graphics for your slides. It matches visuals to your content, enhancing the overall look. This removes the guesswork and ensures your slides look balanced and attractive.
Magic Resize For Different Formats
With AI, Canva can resize your presentation for various platforms. It adapts your slides to fit social media posts, reports, or videos. This keeps your design consistent across all formats without manual adjustments.
Collaborating With Others
Collaborating with others in Canva makes creating presentations easier and faster. Teamwork helps combine ideas and skills. Canva offers simple tools to work together on the same presentation.
Everyone can edit slides at the same time. Changes are saved automatically, so no work is lost. This way, teams stay organized and productive.
Sharing Your Presentation For Collaboration
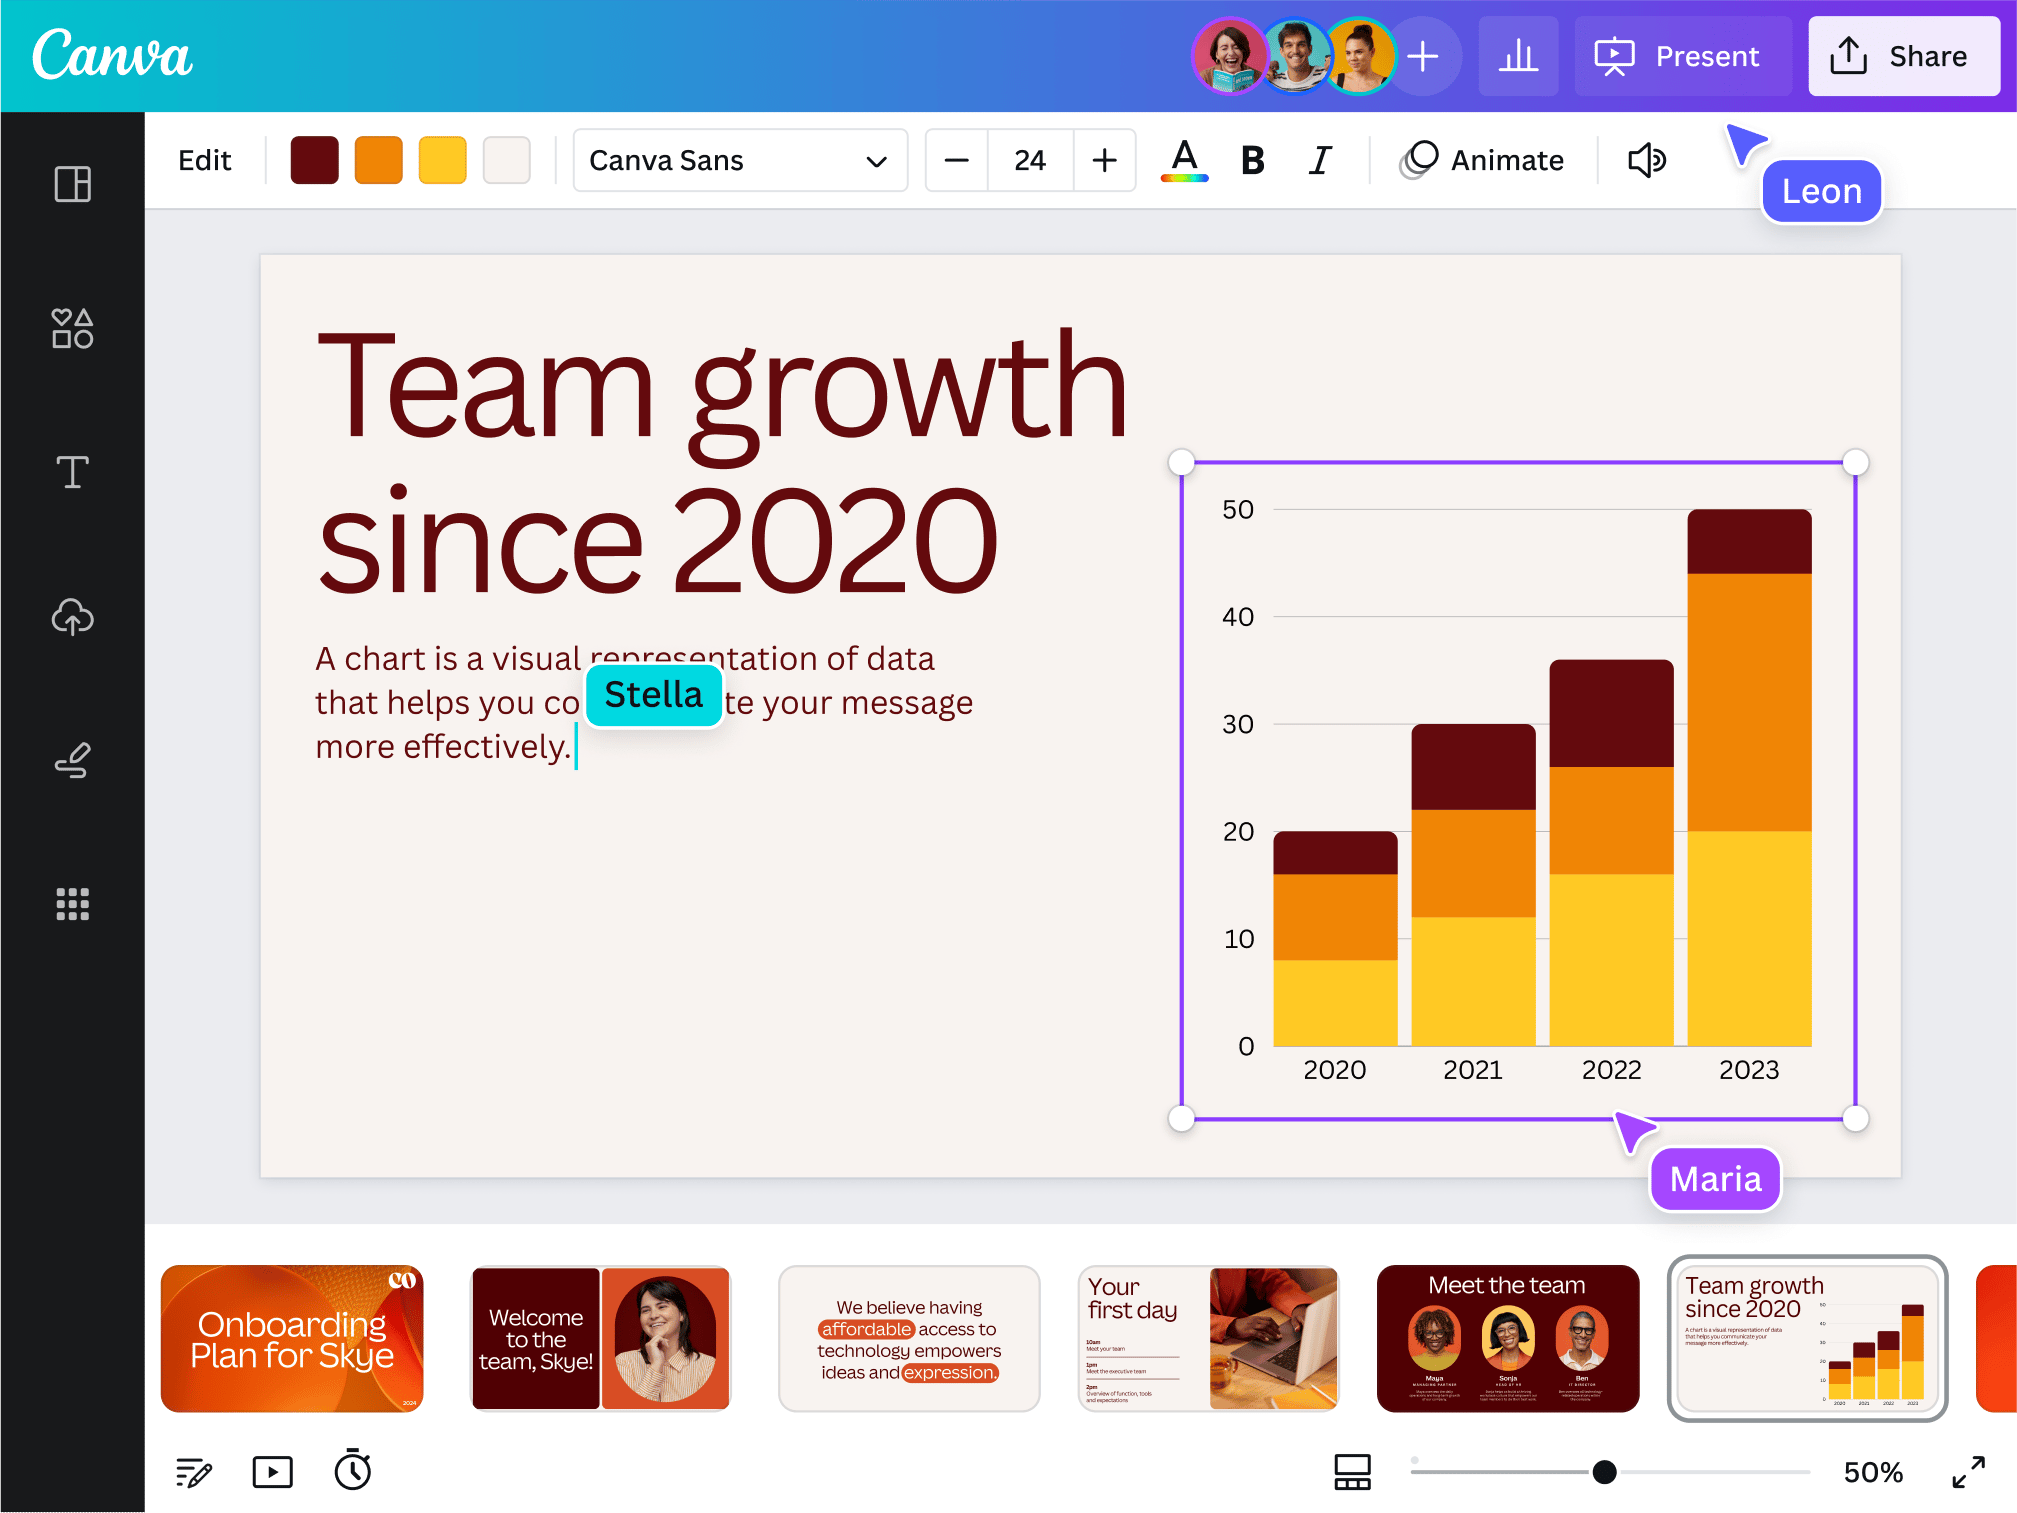
Click the “Share” button at the top right of the editor. Choose whether to invite people by email or create a shareable link. Set permissions to control who can edit or only view the presentation.
Working Together In Real Time
Canva shows who is currently editing the presentation. You can see their cursor and changes as they happen. This real-time collaboration avoids confusion and speeds up the process.
Adding Comments And Feedback
Use the comment feature to leave notes on specific slides or elements. Team members can reply to comments, ask questions, or give suggestions. This keeps feedback organized and easy to track.
Managing Versions And History
Canva automatically saves different versions of your presentation. You can view the history and restore earlier versions if needed. This protects your work from mistakes and unwanted changes.
Presenting And Sharing Slides
Presenting and sharing your slides is the final step in creating a Canva presentation. This process lets you show your ideas clearly and reach your audience easily. Canva offers simple tools to present live or share your slides online. You can use these features to engage viewers and make your message strong.
Present Directly From Canva
Canva allows you to present your slides directly from the editor. Click the “Present” button in the top right corner. Choose between standard or fullscreen mode. Your slides will appear in order, making your presentation smooth and easy to follow. You can control the flow with keyboard arrows or a clicker.
Share Your Presentation Link
Sharing your presentation link is quick and simple. Click “Share” and select “View only” to keep slides safe. Copy the link and send it to your audience by email or social media. They can open the slides on any device without needing a Canva account.
Download Slides For Offline Use
Canva lets you download your presentation in multiple formats. Choose PDF for printing or PowerPoint if you prefer offline editing. You can also download as images or videos for different uses. This option helps when internet access is limited or when you want a backup copy.

Credit: www.youtube.com
Frequently Asked Questions
Can I Use Canva To Create Presentations?
Yes, Canva lets you create presentations using customizable templates, drag-and-drop tools, and AI-powered design features.
Why Do People Use Canva Instead Of Powerpoint?
People use Canva instead of PowerPoint for its easy drag-and-drop interface, extensive templates, and AI-powered design tools. Canva offers more creative flexibility and faster presentation creation.
Is Canva A Powerpoint Presentation?
Canva is not PowerPoint but an online design tool for creating presentations. It offers templates, drag-and-drop editing, and AI features. You can customize slides easily and export them in PowerPoint format if needed. Canva provides a user-friendly alternative to traditional presentation software.
Does Canva Have A Design Tool Like Powerpoint?
Yes, Canva offers a design tool similar to PowerPoint. It features customizable templates, drag-and-drop editing, and AI-powered presentation creation. Users can build slides from scratch or use Magic Design to generate presentations quickly. Canva’s interface supports adding images, animations, charts, and more for engaging presentations.
What Is Canva And How Does It Help Create Presentations?
Canva is an online tool that lets you design presentations easily using templates and drag-and-drop features.
Can I Use Free Templates To Create Presentations On Canva?
Yes, Canva offers many free templates that you can customize for your presentation.
How Do I Start A Presentation On Canva?
Search “Presentations” on Canva, pick a template, and click “Customize this template” to begin.
Does Canva Have Ai Features For Presentations?
Yes, Canva’s AI can generate presentation slides based on your text prompt using Magic Design.
Can I Add Images And Videos To Canva Presentations?
You can add photos, videos, and graphics from Canva’s library or upload your own files.
Is Canva Suitable For Beginners Creating Presentations?
Yes, Canva is user-friendly and perfect for beginners with easy editing and templates.
Conclusion
Creating a presentation with Canva is simple and fun. Choose a template or start fresh to fit your needs. Use easy tools to add text, images, and colors. Canva helps you make clear and attractive slides quickly. Practice a little, and your confidence will grow.
Now, you can share your ideas with style and ease. Give Canva a try for your next presentation!