Minecraft is a world of creativity, survival, and endless building. But every player, from beginners to experts, faces one key problem: keeping their world safe from monsters. In Minecraft, monsters spawn in dark places. The solution? Light. And the most classic way to add light is with torches. But where do you put them, and how far apart should they be? This is what Minecraft torch spacing is all about. Understanding torch spacing is not just about safety—it affects how your world looks, how many resources you use, and even how efficient your farms and bases are. Get it wrong, and you waste materials or leave dark spots where creepers can surprise you. Get it right, and your world stays safe and beautiful.
In this guide, you’ll learn everything you need to master torch spacing in Minecraft. We’ll explain the game’s light system, how monsters spawn, and give clear advice for different situations—whether you’re mining, building a house, or designing a mega base.
We’ll break down math, share practical layouts, and compare torches to other light sources. You’ll also find advanced tips, common mistakes, and answers to the most asked questions. This article will help you feel confident about your torch placement, save resources, and enjoy your Minecraft world more.
Let’s dive deep into torch spacing.
The Basics Of Light In Minecraft
To understand torch spacing, you need to know how light levels work in Minecraft. Every block in the game has a light level from 0 (darkest) to 15 (brightest). Torches create light level 14 at their own block and the light weakens by 1 for each block it travels away from the torch. For example, a block right next to a torch has light level 13, two blocks away is 12, and so on.
Why does this matter? Because hostile mobs (like zombies, skeletons, and creepers) spawn when the light level is 0 in Minecraft 1.18 and later (it was 7 or lower in older versions). This means you want every block in your base and important areas to have a light level above 0 to stop monsters from spawning.
How Light Travels
Light from a torch spreads out in all directions. It travels through air but is blocked or weakened by some blocks, like leaves or tinted glass. Solid blocks can stop the light completely if placed between the torch and the area you want to light.
- Torch placed on the ground: Light level 14 at the torch
- 1 block away (any direction): Light level 13
- 2 blocks away: Light level 12
- And so on, until it reaches 0
You can check the light level of a block by pressing F3 (Java Edition) and looking at the “Client Light” or “Block Light” in the debug screen.
Why Torch Spacing Matters
Placing torches too close wastes resources and can look messy. Placing them too far apart leaves dark spots where mobs can spawn. Good torch spacing balances safety, beauty, and efficiency. Many players don’t realize that even a few missed blocks can lead to dangerous mob spawns, especially in caves and large open spaces.
Calculating Optimal Torch Spacing
Let’s talk about the math behind torch spacing. Since a torch gives light level 14 and it goes down by 1 each block, you need to make sure the farthest block from any torch is still above the required light level.
Surface Vs. Underground
On the surface, sunlight helps during the day, but at night or in caves, you depend on torches. Underground, every block can be dark if not lit up.
The Classic Spacing Rule
For Minecraft 1.18 and later, you only need light level 1 or higher to prevent hostile mob spawning. Before 1.18, you needed light level 8 or higher. Here’s what this means for torch spacing:
- Current versions (1.18+): You can space torches up to 13 blocks apart in a straight line, but diagonal distance changes things.
- Older versions: Maximum safe spacing is 7 blocks apart.
But in practice, many players use a 7×7 grid because it’s easy to remember and gives a safety margin. A 9×9 grid also works for the newest versions, but only if you’re sure no block drops below light level 1.
Visualizing The Spread
Here’s how light spreads from a torch:
| Blocks from Torch | Light Level | Mob Spawn Safe (1.18+)? |
|---|---|---|
| 0 | 14 | Yes |
| 5 | 9 | Yes |
| 13 | 1 | Yes |
| 14 | 0 | No |
If you want to play safe, keep spacing under 13 blocks. If you want to guarantee no mistakes, use a 9×9 grid.
Diagonal Distance
Light travels in a straight line, but if you place torches diagonally, blocks in the center of the grid can get less light. This is where many beginners make mistakes—counting only blocks in a line, not diagonals. Imagine a square: the corner is farther away than the side.
For best coverage, make sure the farthest block (even diagonally) is still above light level 0.
Practical Torch Layouts For Different Areas
Now, let’s look at how to space torches in real Minecraft situations. Each type of area needs a slightly different approach.
Lighting Up A Flat Surface
For big, flat spaces like farms, villages, or the roof of a base, you can use a grid pattern. This gives even coverage and makes sure no dark spots are missed.
- 7×7 Grid: Place a torch every 7 blocks in a straight line, both north-south and east-west. This is safe for all Minecraft versions.
- 9×9 Grid: In Minecraft 1.18+, place a torch every 9 blocks. This uses fewer torches but needs careful checking.
Example: To cover a 21×21 block area:
- 7×7 grid: Place torches at (0,0), (0,7), (0,14), (7,0), (7,7), etc.
- 9×9 grid: Place torches at (0,0), (0,9), (0,18), (9,0), (9,9), etc.
Lighting Tunnels And Corridors
In mines and tunnels, torches are usually placed on the walls or floor. Place them:
- Every 12 blocks on one side (for 1.18+)
- Every 6 blocks for older versions
It’s smart to stagger them—switch sides every few torches. This helps you know which way is home (many players put torches on the right wall when going in, so left is the way out).
Lighting Caves And Mines
Caves are tricky because of uneven ground and strange shapes. Here’s a good method:
- Place torches on the right wall as you explore.
- For big rooms, use a grid pattern.
- Always check corners and behind pillars.
Many players miss small ledges or overhangs, which can create hidden spawn spots. Always look up and light the ceiling if possible.
Lighting Farms And Animal Pens
Farms need light for crops to grow and to stop mobs from trampling. Place torches:
- Around the edges and in the center if the area is big
- Every 8-9 blocks for large fields
For animal pens, put torches on fence posts and corners. This keeps the inside bright and looks neat.
Lighting Up Villages
Villages need good lighting to protect villagers from zombies. Place torches:
- At doorways, on lamp posts, and around the village border
- In larger villages, use grid patterns in open areas
Remember, some zombies can break doors on hard difficulty, so extra light at entrances helps.
Torch Spacing In Special Situations
Not every area is flat or regular. Some places need special torch placement.
Lighting On Stairs And Slopes
Slopes can have hidden dark spots. Place torches:
- On every third or fourth step
- On both sides if the staircase is wide
Check the light level at the top and bottom. Sometimes a torch at the landing is needed.
Large Rooms And Halls
Big spaces, like storage rooms or throne rooms, often have high ceilings. Place torches:
- On the floor in a grid
- On walls, spaced every 7 blocks
- Add extra torches on pillars or in corners
Don’t forget the ceiling—especially in tall rooms. Hanging lanterns or glowstone can help.
Underwater Lighting
Torches break in water, so you can’t use them directly. Use sea lanterns, glowstone, or shroomlights instead. For underwater bases, place these light sources every 8-10 blocks for good coverage.
Comparing Torches To Other Light Sources
Torches are not the only way to light up your world. Let’s compare torches with other common light sources.
| Light Source | Light Level | Unique Features | Best Use |
|---|---|---|---|
| Torch | 14 | Cheap, easy to craft | General lighting |
| Lantern | 15 | Brighter, decorative | Bases, villages |
| Glowstone | 15 | Blocks, water safe | Ceilings, underwater |
| Sea Lantern | 15 | Water safe, modern look | Oceans, modern builds |
| Soul Torch | 10 | Blue light, weaker | Atmosphere, nether |
Insight: Many beginners use only torches, but in some builds, using lanterns or glowstone can give brighter light and a better look, especially in big, open areas.
Advanced Torch Spacing Techniques
If you want your torch placement to be efficient and beautiful, try these advanced methods.
Hexagonal Grid Pattern
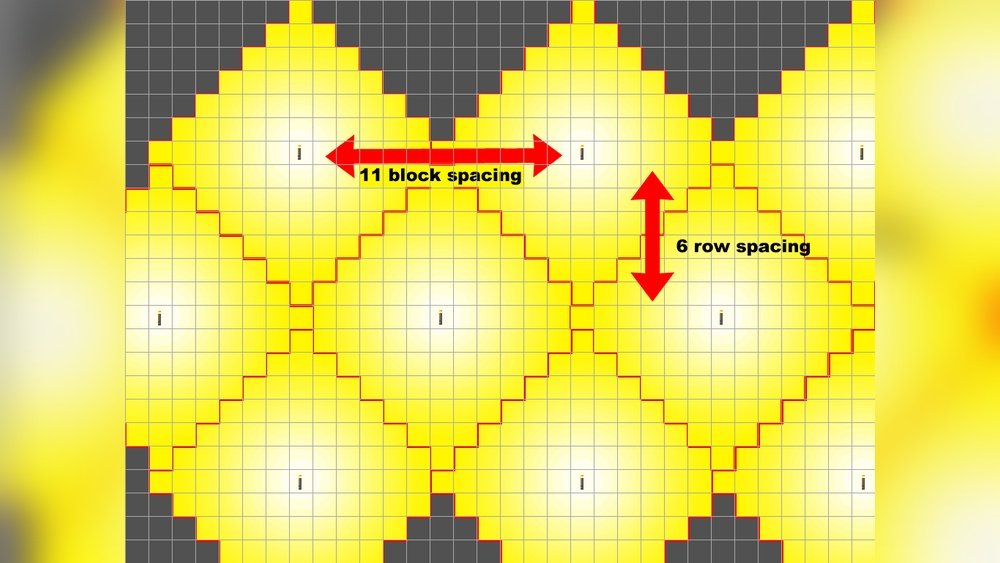
Instead of squares, place torches in a hexagon pattern. This covers more area with fewer torches. Place each torch so that it’s 8 blocks away from its neighbors in six directions. This method is used in real-world lighting design and works well in Minecraft too.
Why use it? Fewer torches, less resource use, and a more natural look.
Hidden Lighting
You can hide torches under carpet or behind leaves. Light still passes through, but you don’t see the torch.
- Place torches on the ground, then cover with carpet (carpet lets light through).
- Or, use glowstone or sea lanterns under carpets for a clean look.
Combining Light Sources
Mix torches with lanterns, shroomlights, or even jack o’lanterns. For example, use torches for main lighting and lanterns for decoration. This makes your base look less repetitive.
Redstone Torch
Redstone torches only give light level 7. They are not safe for mob control but can be used for mood lighting or secret signals.

Credit: www.reddit.com
Mistakes To Avoid In Torch Placement
Even experienced players make errors with torch spacing. Here are common mistakes and how to avoid them:
- Ignoring diagonal distance: Always check corners when spacing torches. A square grid can leave dark spots diagonally.
- Not checking light levels: Use the F3 debug screen (Java Edition) to see real light levels, especially after big builds or changes.
- Only lighting the floor: Mobs can spawn on platforms, stairs, or ledges above you. Always look up.
- Forgetting about block changes: If you add walls or furniture, you might accidentally block light. Check again after decorating.
- Overusing torches: Placing too many torches looks messy and wastes resources. Find the balance.
- Relying on sunlight: Sun goes down, and monsters come out. Always light up your area, even if it seems safe during the day.
Torch Spacing In Minecraft Versions
Minecraft has changed how mobs spawn and how light works over the years. Here’s a quick history:
- Before 1.18: Hostile mobs spawn at light level 7 or lower. Safe spacing is every 6-7 blocks.
- After 1.18: Hostile mobs spawn at light level 0 only. Safe spacing is every 13 blocks.
This change lets you use fewer torches, but be careful if you play on older worlds or servers.
Bedrock Vs Java Edition
Both editions now use the same mob spawning rules, but Bedrock Edition sometimes handles light slightly differently, especially with tinted glass or transparent blocks. Always test your build if you’re not sure.
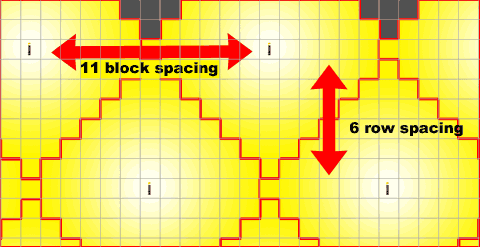
Credit: www.minecraft101.net
Real-world Examples And Data
Let’s look at a few real Minecraft scenarios and how torch spacing works.
Example 1: Mining Tunnel
A player digs a straight tunnel, 2 blocks high and 100 blocks long. If they place torches every 12 blocks, the whole tunnel stays safe in Minecraft 1. 18+. If they use every 6 blocks, it’s safe in all versions.
Example 2: Village Lighting
A village has a large open square, 20×20 blocks. Using a 7×7 grid, you need only 9 torches to cover the whole area. If you use a 9×9 grid (in 1. 18+), only 4 torches are needed, but check corners for dark spots.
Example 3: Mob Farm
Mob farms need exact light levels. Placing torches every 7 blocks stops mobs from spawning. Many farms use hidden lighting (like glowstone under carpet) to keep the area bright and efficient.
Insight: Many players put torches only on the ground, but adding them at different heights—on fences, walls, or even hanging from the ceiling—can improve coverage and style.
Resource Efficiency: Saving Torches
Torches are cheap, but in big builds, every stick and coal matters. Here’s how to use fewer torches without sacrificing safety:
- Use grid spacing (7×7 or 9×9) instead of random placing.
- Combine torches with lanterns or glowstone for large spaces.
- Use hidden lighting for style and coverage.
- Only light areas you need—don’t waste torches on unused spaces.

Credit: www.youtube.com
Visual Comparison Of Torch Spacing
To help you see the effect of different torch spacing, here’s a comparison:
| Spacing | Torch Count (per 100 blocks) | Mob Safe (1.18+)? | Mob Safe (pre-1.18)? |
|---|---|---|---|
| Every 5 blocks | 20 | Yes | Yes |
| Every 7 blocks | 15 | Yes | Yes |
| Every 9 blocks | 11 | Yes | No |
| Every 13 blocks | 8 | Yes | No |
Non-obvious tip: Sometimes it’s worth using more torches than the minimum, especially near your main base, to prevent surprise spawns if you change the area later.
Aesthetic And Functional Considerations
Torch spacing isn’t just about math—it’s also about looks and usefulness.
- Symmetry: Evenly spaced torches look better in big builds.
- Hidden lighting: Use carpets, trapdoors, or leaves to hide torches and keep your build clean.
- Pathways: Spacing torches along paths or roads helps you navigate at night.
- Signs: Use torch placement as a guide—players often use torch patterns to mark directions or safe spots.
Lighting And Performance
In very large worlds, too many light sources can cause lag, especially on older computers or servers. Using efficient torch spacing helps keep your game smooth. Instead of flooding an area with torches, use the grid method or combine with brighter light sources.
Planning Your Lighting: Step-by-step
Here’s a simple plan to get perfect torch spacing in any project:
- Decide the area size: Measure in blocks.
- Choose the right grid: 7×7 for safety, 9×9 for efficiency (1.18+).
- Mark the grid: Use temporary blocks to lay out the pattern.
- Place torches: At grid points, and add extras in corners if needed.
- Check light levels: Walk around at night (or use F3) to spot any dark spots.
- Adjust as you build: If you add walls or furniture, check again.
Using Mods And Tools For Torch Spacing
There are mods and resource packs that show light levels and help with torch placement.
- Light Overlay (Java): Shows red/yellow marks for unsafe blocks.
- MiniHUD: Displays light levels as you move.
These can help, but always double-check your world, especially in multiplayer or with custom maps.
Common Questions And Misconceptions
Many players ask, “Why do mobs spawn in my base even with torches? ” The answer is usually a missed dark spot or an update that changed the rules. Always check with the latest version’s rules and your world’s unique layout.
Some believe placing torches everywhere is best, but smart spacing saves time and resources.
Frequently Asked Questions
What Is The Safest Torch Spacing In Minecraft?
The safest spacing is every 7 blocks in all directions, forming a grid. This works in all versions of Minecraft and prevents any hostile mobs from spawning. For newer versions (1. 18+), you can space torches up to 13 blocks apart, but a 9×9 grid gives a safety margin.
How Can I Check If My Area Is Fully Lit?
Use the F3 screen in Java Edition and look at the “Block Light” value. Make sure every block where mobs could spawn has a light level above 0 (1. 18+). In Bedrock Edition, you can use resource packs or test by standing in the area at night.
Do Torches Work Underwater In Minecraft?
No, torches break when water flows over them. For underwater lighting, use sea lanterns, glowstone, or shroomlights. Place these every 8-10 blocks for good coverage.
Can Mobs Spawn On Top Of Torches?
No, mobs cannot spawn on torches. Placing torches on the ground or on walls prevents spawning in that block, and the light keeps surrounding blocks safe.
Are There Mods That Help With Torch Spacing?
Yes, mods like Light Overlay or MiniHUD show light levels and unsafe spots for mob spawning. Always use mods from trusted sources and make sure they’re updated for your Minecraft version.
For more details on Minecraft’s lighting and mob spawning, you can also check the official Minecraft Wiki.
Lighting your Minecraft world with smart torch spacing keeps you safe, saves resources, and makes your builds look better. With these tips, you’ll never be surprised by a creeper in the dark again.